How to Check Coolant Level on a Honda Civic Step by Step
Knowing how to check coolant level on a Honda Civic is one of the easiest maintenance tasks you can do at home. This step-by-step guide walks you through everything from locating the reservoir to reading the markings safely. You will learn what type of coolant to use, how to spot low coolant symptoms, and simple tips to keep your cooling system in top shape all year long.
Your Honda Civic has a cooling system that works hard every time you turn the key. The engine generates a lot of heat, and without proper coolant flow, things can go wrong very fast. One of the simplest things you can do as a Civic owner is learn how to check coolant level on a Honda Civic. It takes just a few minutes and can save you from a major engine breakdown on a hot day or during a long road trip.
Whether you are a complete beginner or someone who has done a few DIY car jobs before, this guide makes it easy. We will walk you through every step with clear instructions, helpful tips, and common mistakes to avoid. By the end, you will feel confident checking your Honda Civic coolant level on your own. Let us get started.
Key Takeaways
- Check coolant when the engine is cool: Always inspect the coolant level after the engine has cooled down to avoid burns and inaccurate readings.
- Locate the coolant reservoir on the driver’s side: The Honda Civic coolant reservoir is easy to find and has clear minimum and maximum markers.
- Use the right Honda Civic coolant type: Mixing the correct coolant prevents corrosion and keeps your cooling system working efficiently.
- Watch for low coolant warning signs: A rising temperature gauge, steam from the hood, or a dashboard warning light all signal low coolant.
- Refill carefully and bleed the system: Proper refilling prevents air pockets that can cause overheating and damage.
- Regular checks save expensive repairs: Catching low coolant early protects your engine from overheating and costly repairs.
- Know when to call a mechanic: Persistent low coolant or leaks mean it is time for a professional inspection.
📑 Table of Contents
- Why Checking Your Honda Civic Coolant Level Matters
- What You Will Need Before You Start
- Step-by-Step Guide to Checking Coolant Level on a Honda Civic
- Understanding the Coolant Reservoir and Its Marks
- Common Coolant Problems in Honda Civics
- Quick Tips for Honda Civic Coolant Maintenance
- When to Seek Professional Help
- Final Thoughts
Why Checking Your Honda Civic Coolant Level Matters
Coolant, sometimes called antifreeze, is the liquid that keeps your engine from overheating. It flows through the engine block and absorbs heat, then carries that heat away through the radiator. Without enough coolant, your engine can overheat fast. And overheating can lead to cracked heads, blown gaskets, or even a seized engine. Those repairs cost a lot of money.
Here is something many people do not realize. Coolant level drops over time. A small amount of evaporation is normal. But if the level drops too low, your engine does not get the protection it needs. Checking the level regularly is one of the best Honda Civic maintenance habits you can build. It takes almost no time and costs almost nothing.
Another reason this matters is safety. A car that overheats on the highway is dangerous. Steam can block your view, and a sudden breakdown puts you and others at risk. When you know your cooling system is healthy, you drive with more confidence. That peace of mind alone is worth the few minutes it takes to check your coolant.
How Often Should You Check Your Coolant?
Most car experts recommend checking your coolant level at least once a month. You should also check it before any long trip. In summer months, heat causes more evaporation, so you might want to check more often. If you notice any low coolant symptoms, like a temperature gauge creeping up, check it right away.
For Honda Civic owners, the owner’s manual gives specific guidance. Most models suggest a check every two weeks during heavy use. But a monthly check is a good baseline for everyday driving. Make it part of your routine, like checking your tire pressure.
What You Will Need Before You Start
Before you pop the hood, gather a few simple items. You do not need any special tools for this job. Everything you need is easy to find at any auto parts store or online.
- A clean cloth or rag: You will use this to wipe the reservoir and handle any small spills.
- The correct coolant for your Honda Civic: Honda recommends specific types, and we will cover which one below.
- A funnel: This helps you pour coolant without spilling it on engine parts.
- Gloves: Coolant can irritate your skin. A pair of basic rubber gloves works great.
- Safety glasses: Coolant can splash, especially if the system is under pressure. Protect your eyes.
Having everything ready before you start makes the whole process smoother. You will not have to stop midway to find a cloth or run to the store. It is like having all your ingredients ready before you start cooking.
Which Coolant Does Your Honda Civic Use?
Not all coolants are the same. Honda Civic models use a specific type of coolant, often labeled as Honda Super Coolant or a similar OEM-approved formula. Using the wrong type can cause corrosion or reduce cooling efficiency over time. Check your owner’s manual for the exact specification.
If you are not sure what your model needs, look at the cap of the existing coolant reservoir. It often has the type printed on it. You can also ask at any Honda dealership. They can confirm the right coolant type for your specific year and trim. Do not mix different coolant brands unless the labels confirm compatibility.
Step-by-Step Guide to Checking Coolant Level on a Honda Civic
This is the core of the guide. Follow these steps carefully, and you will have your coolant level checked in no time. The process is straightforward, but safety comes first.
Step 1: Park on a Level Surface and Let the Engine Cool
First, park your Honda Civic on a flat, level surface. Turn off the engine and wait at least 15 to 20 minutes. The cooling system will be under pressure when the engine is hot. Opening it too soon can cause hot coolant to spray out and burn you. Patience here is important.
If you have been driving, the engine will be very hot. Give it plenty of time to cool. A good rule of thumb is to check your coolant in the morning before you start the car for the day. That way, the engine has had hours to cool down completely.
Step 2: Open the Hood
Once the engine is cool, it is time to open the hood. Pull the hood release lever inside the car, usually located under the dashboard on the driver’s side. Then go to the front of the car and find the secondary latch. Release it, and the hood will pop up. Support it with the prop rod.
If you are not familiar with opening the hood of your specific model, you can find detailed instructions for your Honda Civic year. Just make sure the car is on a flat surface and the engine is fully cool before you start. Opening the exterior bonnet safely is the first step to a successful coolant check.
Step 3: Locate the Coolant Reservoir
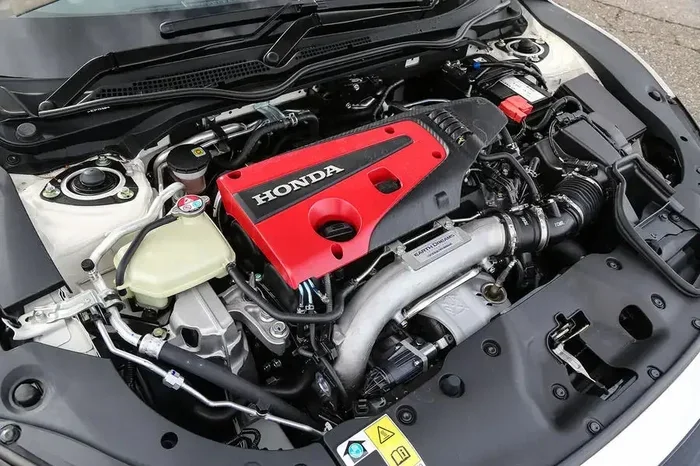
Now, look for the coolant reservoir. On most Honda Civic models, it is located on the left side of the engine bay when facing the front of the car. It is a translucent plastic tank with a cap on top. You should see markings on the side that show the minimum and maximum levels.
The reservoir is connected to the radiator and engine block through hoses. Coolant flows between them as the engine heats up and cools down. The reservoir holds the extra fluid so the system does not lose pressure. If you are having trouble finding it, look for a white or translucent tank near the front of the engine bay with a cap that has a warning symbol on it.
Step 4: Read the Coolant Level
Look at the side of the reservoir. You will see two marks, one for minimum and one for maximum. The coolant level should be between these two lines. If the level is at or near the minimum mark, you need to add more coolant. If it is below the minimum mark, you should add coolant soon.
Do not open the reservoir cap if the engine is even slightly warm. Wait until you are completely sure the system has cooled. Even after a long wait, be careful. Use a cloth over the cap and turn it slowly to release any remaining pressure.
Step 5: Add Coolant If Needed
If the level is low, it is time to add coolant. Remove the reservoir cap carefully. Place a funnel in the opening and pour the coolant slowly. Fill it up to the maximum line but do not overfill. Overfilling can cause the system to pressurize incorrectly and lead to leaks.
Use the correct Honda Civic coolant mixture. Most Honda coolants come pre-mixed, but some require you to mix with distilled water. Check the label. A 50/50 mix of coolant and water is the standard for most climates. In extremely cold areas, you might need a 60/40 mix to prevent freezing.
Step 6: Replace the Cap and Check for Leaks
Once you have added coolant, replace the reservoir cap securely. Wipe any spills with your clean cloth. Start the engine and let it idle for a few minutes. Watch the reservoir and the area around the cap for any signs of leaking. If everything looks dry and the level stays steady, you are good to go.
After the engine reaches normal operating temperature, check the temperature gauge on your dashboard. It should sit in the normal range, usually in the middle. If it climbs higher than usual, pull over safely and turn off the engine. A rising temperature after refilling could indicate a bigger problem like a coolant leak or a failing thermostat.
Understanding the Coolant Reservoir and Its Marks
The coolant reservoir might look simple, but it plays an important role in your Honda Civic’s cooling system. It is not just a storage tank. It helps manage the pressure and flow of coolant as the engine heats up and cools down. Understanding how it works helps you troubleshoot problems faster.
The marks on the reservoir are your main guide. The minimum line shows the lowest safe level. The maximum line shows the highest safe level. The coolant should always sit between these two lines when the engine is cold. Some reservoirs also have a “cold fill” line that is specifically for checking when the engine is cool.
If you notice the level dropping frequently, that is a warning sign. A small drop over several months is normal. But a big drop over a few weeks means something is wrong. It could be a small leak in a hose, a loose reservoir cap, or a more serious issue with the radiator or head gasket.
What the Coolant Color Tells You
Coolant color can also give you clues about the health of your system. Honda Civic coolant is typically blue, green, or pink depending on the model year and type. If the coolant looks rusty, brown, or sludgy, it is time for a change. Old coolant loses its effectiveness and can cause corrosion inside the cooling system.
Clear or watery coolant usually means it has been diluted too much, possibly with tap water instead of distilled water. Always use distilled water when mixing coolant. Tap water contains minerals that can build up and clog the system over time.
Common Coolant Problems in Honda Civics
Honda Civics are reliable cars, but they are not immune to cooling system issues. Knowing the common problems helps you catch them early and avoid expensive repairs.
Low Coolant Due to Small Leaks
The most common reason for low coolant is a small leak. Leaks can happen at hose connections, the radiator, the water pump, or the reservoir itself. Sometimes a leak is so small you do not see it right away. Instead, you just notice the level dropping slowly over time.
If you find yourself refilling coolant often, do not ignore it. Even a tiny leak can grow into a bigger problem. Check under the car for any puddles or stains. Look for wet spots around hoses and connections. A drop of coolant on the ground is often the first clue.
Overheating Despite Normal Coolant Level
Sometimes the coolant level looks fine, but the engine still overheats. This can happen if the thermostat is stuck, the radiator fan is not working, or there is air trapped in the system. Air pockets prevent coolant from flowing properly, which creates hot spots in the engine.
After refilling coolant, some Civics need a bleeding process to remove trapped air. Your owner’s manual may have specific instructions for this. If you are not comfortable doing it yourself, a mechanic can bleed the system quickly and safely.
Corrosion and Sludge Buildup
Over time, coolant breaks down and becomes acidic. This can cause corrosion inside the cooling system. Rust-colored coolant or visible sludge in the reservoir are signs that the coolant needs to be flushed and replaced. Honda recommends replacing the coolant every 3 to 5 years, depending on the model.
Regular coolant flushes keep the system clean and efficient. Think of it like changing the oil in your engine. It is a simple maintenance task that goes a long way toward protecting your car.
Quick Tips for Honda Civic Coolant Maintenance
Here are some practical tips that make coolant maintenance easier and more effective:
- Check the coolant level at the same time each month so it becomes a habit.
- Always use distilled water when mixing coolant. Tap water shortens the life of the coolant.
- Keep a spare bottle of Honda-approved coolant in your trunk for emergencies.
- Clean the area around the reservoir before removing the cap to prevent dirt from entering the system.
- Never open the radiator cap while the engine is hot. The pressurized steam can cause serious burns.
- Record the date and mileage each time you check or refill coolant to track your maintenance schedule.
These small habits add up to big protection for your engine. A well-maintained cooling system keeps your Honda Civic running smoothly for years.
When to Seek Professional Help
Most coolant checks and refills are simple DIY jobs. But some situations call for a professional mechanic. If you notice any of the following signs, it is time to get expert help:
- Coolant leaks that you cannot find: A mechanic has tools to pressure-test the system and locate hidden leaks.
- Frequent overheating even after refilling: This could point to a failing water pump, thermostat, or radiator fan.
- White smoke from the exhaust: This may indicate coolant is leaking into the combustion chamber, which is a serious issue.
- Coolant that looks oily or has a greasy film: This could mean contamination or a head gasket problem.
- The temperature gauge stays in the red zone: Pull over immediately and have the car towed to a shop.
Do not ignore these warning signs. A small problem left unchecked can turn into a very expensive repair. Getting professional help early can save you thousands of dollars in engine damage. A trusted mechanic can also perform a full cooling system inspection and recommend any needed repairs or replacements.
Taking care of your Honda Civic’s cooling system is one of the best things you can do for long-term reliability. Whether you handle it yourself or work with a mechanic, staying on top of your Honda Civic coolant level keeps your engine healthy and your trips worry-free.
Final Thoughts
Checking your coolant level is one of the simplest and most important things you can do for your Honda Civic. It takes just a few minutes, requires no special skills, and can prevent serious engine damage. Now that you know how to check coolant level on a Honda Civic step by step, you have the confidence to handle this task on your own.
Make it a regular part of your car care routine. Check the level monthly, use the right coolant, and watch for warning signs like a rising temperature gauge or steam under the hood. These small actions add up to big protection. Your Honda Civic will reward you with years of reliable, smooth driving.
If you ever feel unsure or notice something that does not look right, do not hesitate to consult a professional. A quick visit to a trusted mechanic can catch problems early and keep your cooling system working at its best. Stay proactive, stay safe, and enjoy the drive.
For more tips on keeping your Honda Civic in great shape, check out our guide on how to prevent a car from overheating in summer. It covers additional steps to keep your engine cool during the hottest months of the year.
Also, if you are new to working on cars, our article on how to open an exterior bonnet provides a detailed walkthrough for first-time hood openers. These resources together give you a solid foundation for basic Honda Civic maintenance.
Remember, a little maintenance goes a long way. Your Honda Civic will keep running strong when you take care of it right. Happy wrenching.
Frequently Asked Questions
What happens if I drive my Honda Civic with low coolant?
Driving with low coolant can cause the engine to overheat, which may lead to serious damage like a cracked head gasket or warped engine block. If you notice the coolant level is low, add the correct type of coolant as soon as possible and avoid long drives until the level is restored.
Can I use water instead of coolant in my Honda Civic?
Water can work in an emergency, but it is not a long-term solution. Water does not have the same heat protection or anti-corrosion properties as coolant. It also freezes in cold weather and can cause mineral buildup. Always use proper Honda-approved coolant mixed with distilled water.
How do I know if my Honda Civic is losing coolant?
Signs of coolant loss include a dropping reservoir level, a sweet smell near the engine, puddles under the car, steam from the hood, or a rising temperature gauge. If you notice any of these, check the coolant level and inspect for visible leaks or wet spots around hoses and connections.
How often should I flush the coolant in my Honda Civic?
Honda recommends flushing and replacing the coolant every 3 to 5 years, depending on the model and driving conditions. Check your owner’s manual for the specific interval. Fresh coolant protects the cooling system better and prevents corrosion from old, acidic fluid.
Is it safe to open the coolant reservoir cap while the engine is warm?
No, it is not safe. The cooling system is pressurized when the engine is warm, and opening the cap can cause hot coolant to spray out and cause burns. Always wait for the engine to cool completely before removing the reservoir cap.
What color is Honda Civic coolant?
Honda Civic coolant is typically blue, green, or pink depending on the model year and type. Always check the label on the coolant bottle and your owner’s manual to confirm the correct type and color. If the coolant looks rusty or dark brown, it is time for a flush and replacement.