What Is the Difference Tail Light vs Tail Light Assembly
A tail light is a single bulb or lens, while a tail light assembly is the complete housing unit that holds all the components together. Understanding this distinction helps you make better repair decisions, save money, and keep your vehicle road-safe. This article breaks down every detail in plain, simple language.
Every car owner eventually faces a moment when a dashboard warning light pops up or a bulb burns out. You might hear someone say, “You need a new tail light,” or “You need a new tail light assembly.” These two phrases sound similar, but they mean very different things. Understanding the tail light vs tail light assembly distinction can save you time, money, and a lot of confusion at the auto parts store. This guide walks you through every detail so you always know exactly what your car needs.
Car lighting is one of the most important safety systems on any vehicle. It helps other drivers see you at night, in rain, and in low-visibility conditions. When something goes wrong with your rear lights, it affects not just your safety but also your legal standing on the road. Let’s dive into what makes a tail light different from a tail light assembly and why that matters for your next repair.
Key Takeaways
- A tail light is just the bulb or lens unit, while a tail light assembly includes the housing, lens, bulbs, and wiring.
- The assembly provides a complete, bolt-in solution, whereas replacing a single tail light only fixes one component.
- Knowing the difference can save you time and money on car repairs.
- OEM and aftermarket assemblies vary in quality, fit, and price.
- Replacing a full assembly is often faster and more reliable than replacing individual parts.
- Tail lights play a key role in vehicle safety and are required by law in most states.
- LED assemblies offer better visibility and longer lifespan than traditional bulb setups.
📑 Table of Contents
- What Is a Tail Light?
- What Is a Tail Light Assembly?
- Tail Light vs Tail Light Assembly: Key Differences
- Why the Assembly Matters for Vehicle Safety
- How to Replace a Tail Light or Assembly
- OEM vs Aftermarket Assemblies: Which Should You Choose?
- Common Mistakes to Avoid
- Expert Insights on Tail Light Maintenance
What Is a Tail Light?
A tail light is the red light mounted at the rear of your vehicle. It illuminates when you turn on your headlights or activate the parking brake. The tail light’s main job is to make your car visible to drivers behind you, especially in dim or dark conditions. It is not the same as a brake light, which shines brighter when you press the gas pedal.
In simple terms, a tail light is just the light source itself. It could be a single bulb, an LED cluster, or a small lens unit. When a mechanic says your tail light is out, they usually mean the bulb has burned out or the lens is cracked. Replacing a tail light often means swapping out just that one component.
How a Tail Light Works
A tail light connects to your vehicle’s electrical system through a simple wiring circuit. When you flip the headlight switch, power flows through the wiring harness to the tail light bulb. The bulb then lights up the red lens cover, which spreads the light outward. Some modern vehicles use LED tail lights instead of traditional incandescent bulbs. LEDs last longer and use less energy.
The tail light is a small part of a much larger system. It works alongside your brake lights, reverse lights, and turn signals to communicate your actions to other drivers. Even though it seems like a minor component, a working tail light is essential for daily driving safety.
Common Tail Light Problems
Tail lights can fail for several reasons. Here are the most common issues car owners face:
- Burned-out bulb: This is the most frequent problem. Bulbs have a limited lifespan and need periodic replacement.
- Blown fuse: A blown fuse in the fuse box can cut power to the tail light circuit entirely.
- Corroded wiring: Exposure to moisture and road salt can cause wiring connections to corrode over time.
- Cloudy or cracked lens: The plastic or glass cover over the bulb can yellow or crack, reducing visibility.
- Bad ground connection: A loose or rusted ground wire can cause intermittent or complete tail light failure.
Most of these problems are easy to fix and do not require a mechanic. However, ignoring a burned-out tail light can lead to a traffic ticket or, worse, an accident.
What Is a Tail Light Assembly?
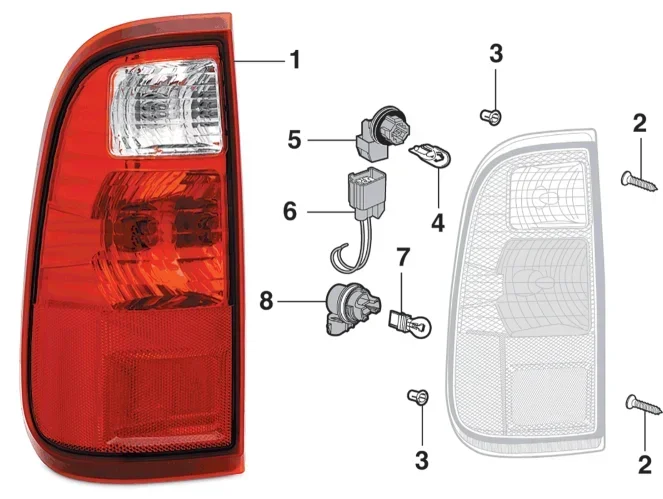
A tail light assembly is the complete housing unit that contains everything needed for your rear tail light to function. It includes the housing itself, the lens cover, the bulb or LED cluster, the socket, the wiring connectors, and sometimes the reflector. Think of the assembly as the entire “unit” that mounts to the back of your car. When you buy a tail light assembly, you get a full, bolt-in replacement piece.
The assembly is designed to fit a specific vehicle make, model, and year. It slides or bolts into place and connects to your car’s wiring with a simple plug. This makes replacement straightforward, even for beginners. Instead of troubleshooting individual parts, you swap out the whole unit and move on.
Components of a Tail Light Assembly
A typical tail light assembly contains several parts working together. Here is a breakdown of what you will find inside:
- Housing: The outer shell that holds everything in place and attaches to the vehicle body.
- Lens cover: The red or clear cover that protects the bulbs and directs the light outward.
- Bulbs or LEDs: The light sources that illuminate when powered by the electrical system.
- Socket and connectors: The plug that connects the assembly to the vehicle’s wiring harness.
- Reflector: The mirrored surface behind the bulb that amplifies and focuses the light beam.
- Mounting hardware: Bolts, clips, or screws that secure the assembly to the trunk or fender area.
Some assemblies also include reverse light bulbs or turn signal elements built into the same unit. This integration is common on modern vehicles where the rear light cluster combines multiple functions into one sleek housing.
Tail Light vs Tail Light Assembly: Key Differences
The difference between a tail light and a tail light assembly comes down to scope and complexity. A tail light is a single component, while the assembly is the complete unit. Let us break this down further so the distinction is crystal clear.
Scope of Replacement
When you replace a tail light, you are replacing just the bulb or the lens. When you replace a tail light assembly, you are replacing the entire housing and all its internal parts. This difference affects both the cost and the time it takes to complete the repair.
Replacing a single tail light bulb is a quick five-minute job. You pop the trunk lid, access the back of the light housing, twist the old bulb out, and twist the new one in. Replacing a full assembly takes a bit more effort but is still manageable for most DIYers. You remove a few bolts, disconnect the wiring plug, and slide the new unit into place.
Cost Comparison
Cost is another major difference. A single tail light bulb costs anywhere from $2 to $15 depending on the type. A full tail light assembly can range from $30 to $200 or more, depending on the vehicle and whether you choose OEM or aftermarket parts. While the assembly costs more upfront, it often provides better long-term value because it addresses all potential failure points at once.
When to Replace Which
Here is a simple rule of thumb to help you decide:
- Replace just the tail light bulb when only the bulb has failed and the housing and lens are in good condition.
- Replace the full tail light assembly when the housing is cracked, the lens is severely damaged, or multiple components have failed.
Choosing between the two options depends on the extent of the damage and your budget. Sometimes replacing the entire assembly is the smarter choice because it prevents future problems and ensures a proper factory fit.
Why the Assembly Matters for Vehicle Safety
Your tail light assembly does more than just light up the road behind you. It plays a critical role in vehicle safety and legal compliance. A damaged or malfunctioning assembly can reduce your visibility to other drivers, increasing the risk of a rear-end collision.
Most states require all exterior lights to be fully functional. A cracked lens or a loose housing can cause your vehicle to fail a safety inspection. Police officers can also pull you over for a burned-out or broken tail light. Replacing the assembly promptly keeps you safe and avoids costly tickets.
Modern tail light assemblies are designed with aerodynamics and style in mind. They not only improve safety but also enhance the overall look of your vehicle. A clean, properly functioning rear light cluster gives your car a finished, polished appearance. This is especially important if you are selling or trading in your vehicle.
Safety Features Built Into Modern Assemblies
Today’s tail light assemblies come with advanced features that older models did not have. Here are some you might find:
- LED technology: LEDs light up instantly, providing faster reaction time for drivers behind you.
- Integrated brake lights: Many assemblies combine tail lights and brake lights into one unit for a cleaner look.
- Daytime running light (DRL) function: Some assemblies include DRL elements that improve visibility during daylight hours.
- Reflective strips: Built-in reflectors increase side visibility and make your vehicle more noticeable at night.
- Water-resistant seals: Modern assemblies use rubber gaskets and seals to prevent moisture damage.
These features make the assembly a more valuable component than ever before. Replacing a damaged assembly with a modern unit can actually improve your vehicle’s overall safety and appearance.
How to Replace a Tail Light or Assembly
Replacing a tail light or a tail light assembly is one of the most manageable car repairs you can do at home. With the right tools and a little patience, you can complete the job in under 30 minutes. Here is a step-by-step guide for both scenarios.
Replacing a Tail Light Bulb
Follow these steps to swap out a burned-out tail light bulb:
- Turn off your vehicle and engage the parking brake.
- Open the trunk and locate the tail light housing from inside the car.
- Find the bulb socket at the back of the tail light unit.
- Unplug the wiring connector by pressing the release tab.
- Remove the old bulb by twisting it counterclockwise or pulling it straight out, depending on the type.
- Insert the new bulb and secure it in the socket.
- Reconnect the wiring plug and test the light before closing the trunk.
Always handle bulbs with a clean cloth or gloves. Oils from your skin can create hot spots on the glass and shorten the bulb’s lifespan. This simple tip can extend the life of your new tail light by months or even years.
Replacing a Full Tail Light Assembly
Replacing the entire assembly follows a similar process but involves a few extra steps:
- Open the trunk and remove any trim panels or covers blocking access to the assembly.
- Locate the mounting bolts or clips holding the assembly in place.
- Unplug the wiring harness from the back of the assembly.
- Remove the bolts or release the clips and carefully pull the old assembly out.
- Slide the new assembly into position and secure it with the mounting hardware.
- Reconnect the wiring harness and test all functions before closing the trunk.
Keep the screws and clips in a safe place during the job. Losing a small bolt can delay your repair and cause frustration. A magnetic tray or a small bowl works great for keeping track of hardware.
Quick Tips for a Smooth Replacement
- Take photos before you start: Pictures help you remember how everything connects and fits.
- Buy the right part: Double-check your vehicle’s make, model, and year before ordering.
- Test before you install: Plug in the new bulb or assembly and confirm it works before mounting it.
- Clean the area: Wipe down the mounting surface to ensure a snug, secure fit.
- Use dielectric grease: A small amount on the connector prevents corrosion and ensures a solid connection.
These tips can make the difference between a frustrating repair and a smooth, successful job. Even if you have never worked on your car before, replacing a tail light assembly is a great beginner project.
OEM vs Aftermarket Assemblies: Which Should You Choose?
When shopping for a replacement, you will encounter two main options: OEM and aftermarket. Understanding the differences helps you make the best choice for your vehicle and your budget.
What Is an OEM Assembly?
OEM stands for Original Equipment Manufacturer. An OEM tail light assembly is made by the same company that produced the original part for your vehicle. It carries the automaker’s branding and meets the exact factory specifications. OEM parts offer a perfect fit and consistent quality, but they usually come at a higher price point.
What Is an Aftermarket Assembly?
Aftermarket parts are made by third-party manufacturers. They are designed to fit your vehicle but are not produced by the original automaker. Aftermarket assemblies come in a wide range of prices and quality levels. Some aftermarket options are nearly identical to OEM parts, while others are budget-friendly alternatives that may not last as long.
Comparison Table
Here is a quick side-by-side comparison to help you decide:
- OEM assemblies: Perfect fit, factory quality, higher cost, full warranty support.
- Aftermarket assemblies: Wide variety, lower cost, varying quality, shorter or limited warranty.
- LED aftermarket assemblies: Modern look, energy-efficient, longer lifespan, brighter output.
- Chrome-finished assemblies: Enhanced appearance, corrosion-resistant, premium look.
For most car owners, a quality aftermarket assembly offers the best balance of price and performance. If you want the exact factory look and do not mind paying more, go with OEM. If you want to save money and do not mind a slight difference in fit or finish, a reputable aftermarket option works great.
Always read reviews before purchasing. Other car owners share their real-world experiences, which can help you avoid low-quality parts. Look for assemblies with solid build quality, proper seals, and positive feedback on durability.
Common Mistakes to Avoid
Even simple repairs can go wrong if you overlook important details. Here are common mistakes car owners make when dealing with tail lights and assemblies:
- Mixing up tail lights and brake light bulbs: These are different parts with different functions. Always check your owner’s manual before purchasing a replacement.
- Ignoring water damage: If moisture has gotten inside the assembly, replacing just the bulb will not fix the problem. The entire assembly may need to be swapped out.
- Over-tightening mounting bolts: Plastic housings can crack if you apply too much force. Hand-tighten bolts and snug them gently.
- Forgetting to test before closing up: Always test the new part before reassembling trim panels or covers. This saves you from having to redo the job.
- Buying the wrong part number: Vehicle models often share similar-looking parts. Always verify the part number matches your specific vehicle.
Avoiding these mistakes keeps your repair process smooth and ensures your new tail light assembly works correctly from day one.
Expert Insights on Tail Light Maintenance
Regular maintenance of your tail lights and assemblies can prevent most problems before they start. Automotive experts recommend a few simple habits:
- Inspect your tail lights monthly: A quick visual check takes less than a minute and catches issues early.
- Clean the lenses regularly: Dirt and road grime can dull the lens and reduce light output. A gentle wash with soap and water does the trick.
- Replace bulbs in pairs: If one tail light bulb has burned out, the other is likely close behind. Replacing both at the same time saves future trips.
- Check the wiring harness: Look for frayed wires or loose connections during your inspections. Catching a wiring issue early prevents bigger problems.
- Address moisture immediately: If you see condensation inside the assembly, dry it out and check the seals for damage.
These small habits add up over time. They keep your vehicle’s rear lighting system in top shape and help you avoid unexpected breakdowns or tickets.
Understanding the difference between a tail light and a tail light assembly empowers you as a car owner. You can make informed decisions, communicate clearly with mechanics, and handle simple repairs yourself. Whether you need a single bulb replacement or a complete assembly swap, you now have the knowledge to get the job done right.
Your vehicle’s lighting system is a critical part of road safety. Take the time to keep it in excellent condition. A well-maintained tail light assembly not only keeps you legal on the road but also protects you and everyone around you. The next time a rear light goes out, you will know exactly what to do.
Stay proactive about your car’s maintenance. Check your lights regularly, replace parts promptly, and invest in quality components. A few minutes of attention today can prevent hours of hassle tomorrow. Your tail lights work hard for you every time you get behind the wheel. Give them the care they deserve.
Frequently Asked Questions
Can I drive with a broken tail light assembly?
Driving with a broken tail light assembly is risky and often illegal. Most states require all rear lights to be fully functional. A damaged assembly reduces your visibility to other drivers and increases the chance of a rear-end collision. Replace the assembly as soon as possible to stay safe and avoid a traffic ticket.
How much does it cost to replace a tail light assembly?
The cost varies depending on your vehicle and the type of assembly you choose. Aftermarket assemblies typically cost between $30 and $150. OEM assemblies can range from $50 to $250 or more. If you replace it yourself, you only pay for the part. Professional installation adds labor charges of $50 to $100 in most cases.
How long does a tail light assembly last?
A quality tail light assembly can last 10 to 15 years or more with proper care. The bulbs inside may burn out sooner, but the housing and lens should remain durable. LED assemblies tend to last longer than traditional bulb setups. Regular cleaning and inspections help extend the life of any assembly.
Is it hard to replace a tail light assembly yourself?
No, replacing a tail light assembly is one of the easiest car repairs you can do at home. Most assemblies are held in place by two or three bolts and a wiring plug. Basic tools like a socket wrench and a flathead screwdriver are all you need. If you can change a light bulb, you can replace a full assembly.
What is the difference between a tail light and a brake light?
A tail light illuminates when you turn on your headlights or parking brake. It shines dimly to make your vehicle visible. A brake light activates when you press the brake pedal and shines much brighter. Both are usually red but serve different functions. They are often housed in the same assembly but use separate bulbs.
Should I choose LED or traditional bulb tail light assemblies?
LED assemblies offer several advantages over traditional bulbs. They light up faster, last longer, and use less energy. Many drivers prefer the modern look of LED assemblies as well. However, LED replacements can cost more upfront. If you want long-term value and better performance, LED is the way to go.
=== CONCLUSION ===
The difference between a tail light and a tail light assembly is simpler than it sounds. A tail light is the individual bulb or light source, while the assembly is the complete housing unit that holds everything together. Knowing this distinction helps you choose the right part, save money, and complete repairs with confidence.
Whether you are replacing a single bulb or swapping out the entire tail light assembly, the process is straightforward and well within the reach of most car owners. Regular maintenance and prompt replacements keep your vehicle safe, legal, and looking great on the road. Take the time to understand your car’s lighting system, and you will be rewarded with fewer surprises and more peace of mind behind the wheel.