How to Save Tesla Dashcam Footage Without Losing It
Saving Tesla dashcam footage is essential for protecting yourself after an incident or capturing important moments on the road. Whether you use a USB drive, the Tesla app, or Sentry Mode, knowing how to save Tesla dashcam footage properly ensures your clips are never lost. This guide walks you through every method, setting, and tip you need to keep your recordings safe and accessible.
Your Tesla is packed with smart technology, and the dashcam is one of the most useful features you have. Every time you drive, the front camera, rear camera, and cabin camera work together to capture everything happening around and inside your vehicle. But here is the thing most Tesla owners do not think about until it is too late: how to save Tesla dashcam footage before it gets overwritten.
Whether you were in a minor fender bender, witnessed a hit-and-run, or simply want to keep a clip of a beautiful road trip, saving your dashcam footage the right way matters. The process is not complicated, but it does require a few simple steps and some basic knowledge about how your Tesla stores and manages video recordings.
In this guide, we will walk you through every method for how to save Tesla dashcam footage without losing a single clip. From USB export to Sentry Mode settings, we cover everything you need to know. Let us get started.
Key Takeaways
- USB Export Is the Primary Method: Saving dashcam footage to a formatted USB drive is the most reliable way to preserve your clips.
- Sentry Mode Adds Extra Protection: Enabling Sentry Mode ensures your Tesla keeps recording even when parked, capturing incidents automatically.
- Loop Recording Can Overwrite Footage: Understanding how loop recording works helps you save important clips before they get deleted.
- Format Your USB Drive Correctly: Using FAT32 or exFAT formatting prevents compatibility issues and ensures smooth recording.
- Use the Tesla App for Remote Access: The Tesla app lets you view and download clips from anywhere, adding convenience to your dashcam workflow.
- Act Quickly After an Incident: The sooner you save your dashcam footage, the less likely it is to be overwritten by new recordings.
📑 Table of Contents
- How Tesla Dashcam Recording Works
- How to Save Tesla Dashcam Footage Using a USB Drive
- Using Tesla Sentry Mode to Protect Your Footage
- Managing Storage and Preventing Footage Loss
- Saving Footage Through the Tesla Mobile App
- Common Dashcam Issues and How to Fix Them
- Expert Tips for Preserving Tesla Dashcam Clips
- Final Thoughts on Saving Tesla Dashcam Footage
How Tesla Dashcam Recording Works
Before you can save your footage, it helps to understand how the Tesla dashcam system works. Your Tesla uses a continuous recording system that captures video from multiple angles. The front camera sits behind the rearview mirror, the rear camera is built into the trunk area, and the cabin camera faces the interior of the vehicle.
By default, your Tesla uses a feature called loop recording. This means the dashcam constantly records and overwrites the oldest footage to make room for new clips. The cameras record in high definition, and each clip typically lasts about 10 minutes before the system moves on to the next segment.
The dashcam settings let you control several aspects of recording. You can turn the cameras on or off, adjust the quality, and enable features like Sentry Mode. But the key thing to understand is that without saving clips to an external source, your footage is always at risk of being overwritten.
The Role of the Front and Rear Cameras
The front camera captures what is happening ahead of your vehicle. It is the primary source of dashcam footage and the most commonly saved clip. The rear camera records what is behind you, which is incredibly useful for parking incidents or rear-end collisions. Together, these two cameras give you a complete picture of your driving environment.
The cabin camera, which faces the interior, is not always enabled by default. You can turn it on through the dashcam settings, and it can be valuable for capturing incidents that involve the inside of your vehicle.
Understanding Dashcam Settings and Recording Modes
To access your dashcam settings, tap the Tesla icon on your touchscreen, go to Controls, then select Dashcam. From there, you can toggle Sentry Mode on or off, adjust camera quality, and manage recording preferences. Taking a few minutes to explore these settings can make a big difference when you need to save footage quickly.
Here are the key settings you should know about:
- Loop Recording: Continuously records and overwrites old footage. This is the default setting.
- Sentry Mode: Uses the car’s alarm system to trigger enhanced recording when it detects a threat.
- Camera Quality: You can choose between standard and high-quality recording.
- Dashboard Preview: Lets you view a live feed from your cameras on the touchscreen.
How to Save Tesla Dashcam Footage Using a USB Drive
The most reliable way to save Tesla dashcam footage is by exporting clips to a USB drive. This method gives you permanent copies of your recordings that you can store, share, or back up however you like. It is also the method Tesla officially recommends for preserving important footage.
Step-by-Step USB Export Process
Follow these steps to save your dashcam clips to a USB drive:
- Insert a Formatted USB Drive: Make sure your USB drive is formatted as FAT32 or exFAT. Your Tesla will not recognize drives formatted as NTFS. You can format the drive on your computer before inserting it into the front USB port.
- Navigate to the Dashcam Folder: On your Tesla touchscreen, go to the Tesla icon, then Controls, then Dashcam. Select the clip you want to save.
- Copy the File to the USB Drive: Once you select the clip, your Tesla will display the video file location. Insert a USB drive into the front USB port, and the system will allow you to copy the file directly to the drive.
- Verify the Save: After copying, eject the USB drive safely and check the file on a computer to make sure the video plays correctly.
This process takes just a few minutes, and it ensures your dashcam footage is safely stored on an external device. The front USB port is the primary port for dashcam-related file transfers, so make sure you are using the correct one.
Which USB Drive Should You Use?
Not all USB drives work equally well with Tesla vehicles. Here is what to look for when choosing a drive for saving your dashcam footage:
- Capacity: A drive with at least 32GB of storage is ideal. This gives you plenty of room for multiple clips without taking up too much space.
- Speed: Look for a drive with fast read and write speeds. A USB 3.0 or USB 3.1 drive will handle large video files much better than an older USB 2.0 drive.
- Reliability: Choose a reputable brand. Cheap, no-name drives are more likely to fail or corrupt your saved footage.
- No External Power Needed: The Tesla front USB port provides enough power for most standard drives, so you do not need a powered hub.
Think of it like this: you would not want to store precious memories on a drive that might stop working tomorrow. Invest in a quality USB drive, and your save video files will stay safe for years.
Using Tesla Sentry Mode to Protect Your Footage
Tesla Sentry Mode is one of the most powerful features for protecting your vehicle and its dashcam footage. When Sentry Mode is active, your Tesla uses the cameras and alarm system to monitor the surroundings. If the system detects a potential threat, it switches to a higher-quality recording mode and saves the footage automatically.
Sentry Mode is especially useful when your car is parked. If someone hits your Tesla in a parking lot or tries to break in, the system records the incident and saves the clip to your USB drive. Without Sentry Mode, these incidents might go completely undocumented.
How Sentry Mode Saves Footage Automatically
When Sentry Mode is enabled and an event is detected, your Tesla does several things automatically:
- It records high-quality video from the front and rear cameras.
- It saves the footage to the USB drive in a dedicated folder.
- It triggers the car alarm to deter further threats.
- It displays a warning message on the touchscreen.
This means that even if you are not near your Tesla when an incident occurs, the dashcam footage is preserved and ready for you to save later. Just remember to check your USB drive periodically and copy important clips to a safe location.
One thing to keep in mind: Sentry Mode uses more battery power than normal driving. If you are concerned about battery drain, you might want to check how long a hybrid can sit without being driven for general guidance on vehicle battery health during extended parking periods.
Enabling and Disabling Sentry Mode
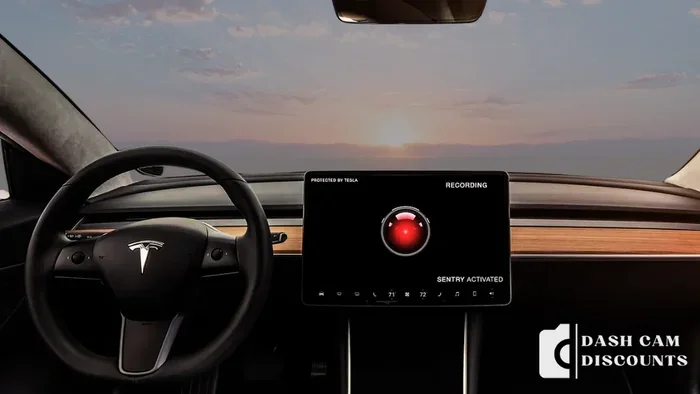
You can turn Sentry Mode on or off from the Tesla touchscreen. Go to the Tesla icon, then Controls, then Safety & Security, and toggle Sentry Mode. You can also control it remotely through the Tesla mobile app. When Sentry Mode is active, you will see a red circle icon at the top of the touchscreen display.
Managing Storage and Preventing Footage Loss
One of the biggest risks with Tesla dashcam footage is losing it to loop recording. Because the system continuously overwrites old clips, you need to save important footage before it gets replaced. This is especially critical if you were involved in an accident or witnessed an incident.
The Importance of Quick Action
The moment you realize you need to save a clip, do it as soon as possible. The longer you wait, the higher the chance that loop recording will overwrite the footage. Think of it like this: your Tesla dashcam is always recording, but it is also always deleting. Only by actively saving clips can you keep them permanently.
Here are some practical tips to prevent footage loss:
- Save clips immediately after an incident. Do not wait until you get home. Even a short delay could result in the clip being overwritten.
- Check your USB drive regularly. Make sure the drive is connected and functioning properly before you need it.
- Keep a backup USB drive in your car. Having a second drive means you always have a way to save footage, even if your primary drive is full.
- Format your USB drive monthly. Regular formatting keeps the drive optimized and reduces the risk of file corruption.
Storage Management Best Practices
Proper storage management is the foundation of a reliable dashcam system. Here is how to keep everything running smoothly:
- Format the USB drive in your Tesla before first use. This ensures the drive is set up correctly for Tesla’s file system.
- Use a dedicated drive for dashcam footage. Do not mix dashcam files with music or other media on the same drive.
- Delete old clips you no longer need. This frees up space for new recordings and keeps your drive organized.
- Copy saved clips to your computer or cloud storage. This creates a secondary backup in case the USB drive is lost or damaged.
Good storage management might seem like a small detail, but it makes a huge difference when you actually need your dashcam footage. Taking five minutes to organize your files can save you hours of frustration later.
Saving Footage Through the Tesla Mobile App
The Tesla mobile app offers another convenient way to access and save your dashcam footage. Through the app, you can view live camera feeds, check recorded clips, and download footage directly to your phone. This is especially useful when you are away from your Tesla and need to save a clip quickly.
How to Access Dashcam Clips via the App
To view and save footage through the Tesla app, follow these steps:
- Open the Tesla app on your smartphone.
- Tap the Camera icon to access the live camera feeds.
- Navigate to the Clips section to see saved recordings.
- Select the clip you want to save and download it to your phone.
Keep in mind that the app only shows clips that have been saved to the USB drive or clips that are currently stored in the car’s memory. If a clip has been overwritten by loop recording, it will not appear in the app. This is another reason why saving footage promptly is so important.
If you are concerned about how long your Tesla can remain in idle mode without draining the battery, you might want to read about how long a car can idle safely for helpful insights on managing your Tesla’s battery while parked.
Common Dashcam Issues and How to Fix Them
Even with the best setup, you may encounter issues with your Tesla dashcam from time to time. Here are some common problems and their solutions:
Footage Not Saving to USB Drive
If your Tesla is not saving footage to the USB drive, the first thing to check is the drive format. Make sure it is formatted as FAT32 or exFAT. Also, try a different USB port or a different USB drive to rule out hardware issues. Sometimes simply restarting the touchscreen by holding down the two scroll wheels on the steering wheel can resolve the problem.
Camera Not Recording
If one or more cameras are not recording, check the dashcam settings to make sure all cameras are enabled. Also, inspect the camera lenses for dirt or debris. A dirty lens can cause blurry or completely black footage. A quick wipe with a soft cloth usually fixes the issue.
Sentry Mode Not Triggering
If Sentry Mode is not activating properly, make sure it is enabled in your settings and that your Tesla has a stable Wi-Fi connection. Some users have found that updating their Tesla software resolves Sentry Mode issues. You can check for updates by going to Controls, then Software, and tapping Check for Updates.
Clips Appearing Corrupted
If your saved clips will not play or appear corrupted, try copying them to a different USB drive or a different computer. The issue might be with the USB drive itself rather than the Tesla. Using a high-quality, reliable USB drive minimizes this risk.
Expert Tips for Preserving Tesla Dashcam Clips
Here are some expert-level tips that will help you get the most out of your Tesla dashcam and ensure you never lose important footage:
- Create a folder system on your USB drive. Make separate folders for different dates or incident types. This makes it easy to find specific clips later.
- Use the cabin camera for parking incidents. Enable the cabin camera in your dashcam settings to capture what is happening inside your car when you are away.
- Check your dashcam footage weekly. Even if nothing seems wrong, making it a habit to review your clips keeps you familiar with the system and helps you catch issues early.
- Keep your Tesla software up to date. Tesla regularly improves the dashcam system through software updates. Staying current ensures you have the best recording quality and features.
- Consider cloud backup options. While Tesla does not currently offer built-in cloud storage for dashcam clips, third-party solutions can help you back up your footage online for extra security.
- Label important clips. If you save a clip after an incident, rename the file with the date and a brief description. This saves time when you need to find the clip later, whether for insurance or legal purposes.
Taking a few extra minutes to organize and back up your footage might seem like overkill until you actually need it. The peace of mind that comes with knowing your dashcam footage is safely stored is well worth the small effort.
Final Thoughts on Saving Tesla Dashcam Footage
Your Tesla dashcam is a powerful tool for protecting yourself and your vehicle on the road. But the footage it captures is only useful if you know how to save it properly. By following the steps in this guide, you can ensure that every important clip is preserved and never lost to loop recording or storage issues.
Remember to use a quality USB drive, save clips promptly after incidents, enable Sentry Mode for extra protection, and back up your footage regularly. These simple habits will make a huge difference the day you need your dashcam recordings the most.
Whether you drive a Tesla Model 3, a Tesla Model Y, or any other Tesla vehicle, the dashcam is one of the most valuable features you have. Take the time to understand it, set it up correctly, and maintain it. Your future self will thank you when you need that footage most.
Start implementing these tips today, and you will have full confidence that your Tesla dashcam footage is always safe, always accessible, and always ready when you need it.
Frequently Asked Questions
Can I save Tesla dashcam footage without a USB drive?
Yes, you can view and save clips through the Tesla mobile app, but a USB drive is the most reliable method for permanent storage. The app only shows clips that are currently stored in the car or saved to the USB drive. Without a USB drive, your footage is at risk of being overwritten by loop recording.
How long does Tesla keep dashcam footage before deleting it?
Tesla uses loop recording, which means old footage is continuously overwritten by new recordings. There is no set time limit, but clips are typically overwritten within a few hours or days depending on how much you drive. This is why saving important clips to a USB drive as soon as possible is so critical.
Does Sentry Mode drain my Tesla battery?
Sentry Mode does use more battery than normal driving because the cameras and alarm system remain active. If your Tesla sits idle for long periods, battery drain can become a concern. To learn more about how long different vehicles can sit without being driven, you can check general guidance on battery health during extended parking.
What format are Tesla dashcam clips saved in?
Tesla dashcam clips are saved as MP4 video files, which are widely compatible with most devices and media players. When you save footage to a USB drive, the files are stored in a dedicated dashcam folder with a simple file naming system based on the date and time of recording.
Can I save footage from the rear camera separately?
Yes, you can save footage from the rear camera separately. When you select a clip in the Dashcam menu, you can choose which camera angle to save. The front camera footage is the most commonly saved, but the rear and cabin camera clips are equally accessible through the same USB export process.
Can I share Tesla dashcam footage on social media?
Absolutely. Once you have saved your dashcam clips to a USB drive or downloaded them to your phone through the Tesla app, you can share them on social media just like any other video file. The MP4 format makes sharing easy across all platforms, whether you are posting to Instagram, Twitter, or YouTube.
=== CONCLUSION ===
How to save Tesla dashcam footage is a skill every Tesla owner should master. The process is simple, the tools are built right into your vehicle, and the peace of mind it gives you is invaluable. By using a USB drive, enabling Sentry Mode, managing your storage properly, and saving clips quickly after incidents, you ensure that your dashcam recordings are always there when you need them.
Take a few minutes today to check your USB drive, review your dashcam settings, and make a habit of saving important clips. Your Tesla dashcam works hard for you every time you get behind the wheel. Give it the same effort in return by protecting your footage properly.