How to Remove Difficult Things From Your Auto Glass
Removing tough spots from your auto glass doesn’t have to be a headache. This guide covers everything from bug splatter and tree sap to stubborn stickers and adhesive residue. You will learn safe, effective methods using common household items and professional tools. Whether your windshield is covered in road grime or your car windows are stuck with old decals, these tips will help you restore clear visibility. Read on to find the best removal techniques for every type of mess on your auto glass.
Have you ever looked at your windshield and thought, “How did all this get here?” Maybe it is a bug splatter from a summer road trip. Perhaps it is tree sap from parking under an oak tree. Or maybe you are dealing with old stickers that just will not budge. Whatever the mess, removing difficult things from your auto glass is a task almost every car owner faces at some point.
The good news is that you do not need expensive equipment or a trip to the shop. With the right approach and a few simple tools, you can tackle even the toughest grime on your auto glass. This guide walks you through every method, every mistake to avoid, and every pro tip that makes the job easier. By the end, you will feel confident handling any windshield cleaning challenge that comes your way.
Key Takeaways
- Soften first, scrape second: Always use heat or a cleaning solution to loosen debris before scraping to avoid scratches.
- Use the right tools: Razor blades, plastic scrapers, and microfiber cloths work best for different types of residue.
- Avoid harsh chemicals: Ammonia-based cleaners can damage auto glass coatings and rubber seals over time.
- Prevention is key: Applying protective films and regular cleaning stops buildup from becoming a difficult problem.
- Know when to call a pro: Deep scratches or cracks need professional windshield repair, not DIY removal.
- Household items work wonders: Vinegar, baking soda, and WD-40 are affordable and effective for most auto glass problems.
📑 Table of Contents
- Why Sticky Messes Build Up on Auto Glass
- Tools and Supplies You Need for Auto Glass Cleaning
- How to Remove Bug Splatter From Your Windshield
- Removing Tree Sap and Pitch From Car Windows
- How to Remove Stickers, Decals, and Adhesive From Auto Glass
- Dealing With Paint Splatter and Other Hard Substances
- Common Mistakes to Avoid When Cleaning Auto Glass
- When to Call a Professional for Auto Glass Help
- Key Takeaways
- Conclusion
Why Sticky Messes Build Up on Auto Glass
Understanding why things stick to your car window glass helps you choose the right removal method. Different substances bond to glass in different ways. Heat, UV rays, and weather all play a role in making these messes harder to remove over time.
The Science Behind Stubborn Residue
When bugs hit your windshield at highway speeds, the proteins in their bodies bond to the glass. Over time, heat from the sun cooks these proteins into a hard shell. Tree sap contains oils that slowly seep into tiny pores in the glass surface. Adhesive from stickers and decals forms a strong bond as it ages. The longer these substances sit, the harder they become to remove.
Rain and road grime add another layer. Dirt mixes with sap and bug splatter, creating a cement-like layer that clings tightly. This is why auto detailing experts always recommend cleaning your glass regularly before buildup becomes a serious issue.
Tools and Supplies You Need for Auto Glass Cleaning
Before you start, gather your supplies. Having everything ready saves time and prevents frustration. Here is what you need in your toolkit.
Essential Tools
- Plastic scraper or credit card: Safe for scraping without scratching glass.
- New razor blade with holder: Great for tough adhesive when used carefully.
- Microfiber cloths: Lint-free and gentle on glass surfaces.
- Spray bottle: For applying cleaning solutions evenly.
- Heat gun or hair dryer: Softens adhesive and sap for easier removal.
- Bucket and warm water: For rinsing and mixing cleaning solutions.
Cleaning Solutions That Work
- White vinegar and water: A natural cleaner that cuts through light residue.
- Baking soda paste: A mild abrasive for stubborn spots.
- WD-40 or similar lubricant: Breaks down adhesive and sap effectively.
- Isopropyl alcohol: Dissolves sticky residue without harming glass.
- Ammonia-free glass cleaner: Safe for auto glass and rubber seals.
- Commercial adhesive remover: Designed specifically for paint and glass surfaces.
How to Remove Bug Splatter From Your Windshield
Bug splatter is one of the most common and frustrating problems with auto glass. Those tiny bodies seem to bake onto your windshield within hours of driving. Left untreated, they can cause windshield pitting and even tiny scratches that spread light and reduce visibility at night.
Method 1: The Soak and Scrape Approach
Start by soaking the affected area with warm water. Let it sit for five to ten minutes. This softens the protein bonds in the bug remains. Next, spray a generous amount of ammonia-free glass cleaner directly onto the splatter. Wait another two to three minutes.
Take your plastic scraper and hold it at a 30-degree angle to the glass. Gently glide it across the splatter. Do not press too hard. Let the tool do the work. Wipe the area with a microfiber cloth dampened with clean water. Repeat if needed until the glass is clear.
Method 2: Using Vinegar for Natural Bug Removal
Mix equal parts white vinegar and warm water in your spray bottle. Spray the solution generously on the bug splatter. Let it sit for ten minutes. The acidity in the vinegar breaks down the proteins effectively. After soaking, use a soft sponge to gently wipe the area clean. Rinse with fresh water and dry with a microfiber cloth for a streak-free finish.
Method 3: WD-40 for Stubborn Bug Residue
For really baked-on bugs, WD-40 works wonders. Spray a small amount directly onto the splatter. Let it sit for three to five minutes. The lubricant penetrates and loosens the bond between the bug remains and the glass. Wipe away with a cloth and rinse thoroughly. Always clean the glass with a proper glass cleaner afterward to remove any oily residue from the WD-40.
Removing Tree Sap and Pitch From Car Windows
Tree sap is one of the toughest substances to deal with on auto glass. It is sticky, oily, and seems to appear out of nowhere. Parking under pine trees, oaks, or maples puts your car at risk. The good thing is that sap removal is straightforward once you know the right technique.
Using Heat to Soften Sap
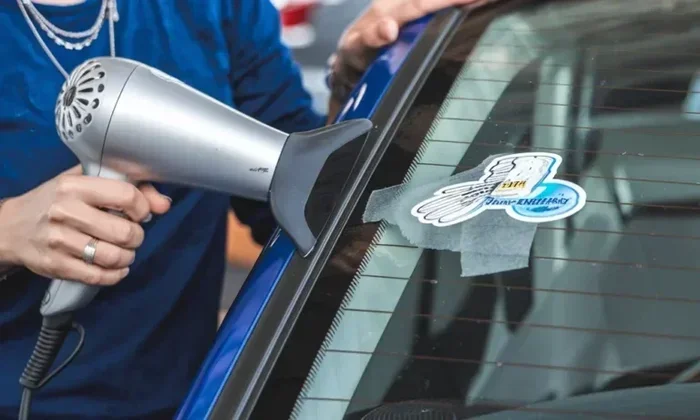
A heat gun or even a regular hair dryer works well here. Set the tool to a low or medium setting. Hold it a few inches from the sap spot and warm it for about 30 seconds. The heat makes the sap soft and pliable. Take your plastic scraper and gently lift the sap off the glass. Work slowly to avoid spreading the sap to a larger area.
Using Rubbing Alcohol for Remaining Sap
Sometimes a thin film of sap remains after scraping. Dampen a microfiber cloth with isopropyl alcohol. Gently rub the remaining sap in circular motions. The alcohol dissolves the oils without damaging the glass. Finish by wiping the area with a clean, damp cloth and drying it with a fresh microfiber towel.
Dealing With Sap That Has Been on the Glass Too Long
Old, hardened sap needs extra attention. Mix a paste of baking soda and water. Apply it to the sap spot and let it sit for fifteen minutes. The mild abrasion helps lift the sap without scratching the glass. Rinse well and repeat if necessary. For deeply embedded sap, a commercial adhesive remover may be your best option.
How to Remove Stickers, Decals, and Adhesive From Auto Glass
Maybe you bought a used car with old bumper stickers still on the window. Perhaps you removed a phone mount and left behind a messy adhesive patch. Adhesive residue removal from auto glass requires patience and the right technique. Rushing the process can lead to scratches or streaks.
Step-by-Step Sticker Removal
- Warm the sticker: Use a hair dryer on a medium setting. Hold it close to the sticker and heat it for 30 to 60 seconds. The warmth weakens the adhesive bond.
- Peel slowly: Start at one corner and pull the sticker back at a 180-degree angle. Pulling slowly and low helps remove more of the adhesive with the sticker itself.
- Treat the residue: Apply a small amount of WD-40, rubbing alcohol, or adhesive remover to the remaining sticky area.
- Let it sit: Wait two to three minutes for the solution to break down the adhesive.
- Wipe clean: Use a microfiber cloth to rub away the loosened residue. Repeat if needed.
- Final clean: Wash the area with glass cleaner and dry with a fresh cloth for a spotless finish.
Preventing Adhesive Damage on Your Windshield
If you frequently apply and remove items from your windshield, consider using a protective film or static-cling mat. These create a barrier between the adhesive and your glass. When you remove the film, the adhesive comes with it, leaving your auto glass untouched and undamaged.
Dealing With Paint Splatter and Other Hard Substances
Paint spots from a nearby construction project or a wayward spray can can land on your car window glass. These need a different approach than organic messes like bugs or sap. Fresh paint is easier to remove than dried paint, so act quickly when you notice a new spot.
Removing Fresh Paint
If the paint is still wet, act fast. Blot it gently with a clean cloth dampened with rubbing alcohol. Do not rub, as this can spread the paint. Keep blotting until the paint lifts off the glass. Rinse the area with warm water and dry it thoroughly.
Removing Dried Paint
For dried paint, start by applying a small amount of acetone or nail polish remover to a cloth. Gently dab the paint spot. The acetone softens the paint without harming the glass. After a minute or two, wipe the paint away with a clean section of the cloth. Follow up with glass cleaner to remove any chemical residue.
Warning: Never use a razor blade on fresh paint spots. The blade can push the paint deeper into micro scratches on the glass surface. Always soften the paint first with a solvent before attempting removal.
Handling Road Tar and Grease Marks
Road tar and grease are common on the lower parts of your windshield and side windows. Apply a small amount of WD-40 or a commercial tar remover to the affected area. Let it sit for a few minutes. The solvent breaks down the tar and grease. Wipe away with a microfiber cloth and rinse with glass cleaner. For tough tar spots, repeat the process once or twice until the glass is completely clean.
Common Mistakes to Avoid When Cleaning Auto Glass
Even with the best intentions, many people make mistakes that damage their auto glass or leave it looking worse than before. Knowing what not to do is just as important as knowing what to do.
Using the Wrong Scraper
Metal scrapers and rough pads can create deep scratches on your windshield. Always use a plastic scraper or a dedicated glass-safe razor blade holder. These tools lift debris without damaging the glass surface.
Skipping the Pre-Soak Step
Jumping straight to scraping without softening the residue first is a common error. Soaking loosens the bond and reduces the friction between the scraper and the glass. This single step can prevent most scratches and streaks.
Using Too Much Pressure
Let the cleaning solution or tool do the work. Pressing too hard on a scraper or cloth can cause uneven wear on the glass. Gentle, consistent pressure produces the best results for windshield repair and cleaning tasks.
Neglecting the Rubber Seals
Your auto glass is held in place by rubber seals. Harsh chemicals can dry out and crack these seals over time. Always use cleaners that are safe for rubber and vinyl. After cleaning, apply a small amount of rubber conditioner to keep the seals flexible and airtight.
When to Call a Professional for Auto Glass Help
Most difficult messes can be handled at home with the methods described above. However, some situations call for a professional touch. Deep scratches that run your fingernail across them need windshield repair or replacement. Cracks that spread across the glass compromise its structural integrity. In these cases, a professional auto glass specialist can assess the damage and recommend the right fix.
Also, if you are dealing with a large area of heavy pitting from years of bug impacts, a professional can advise whether the glass needs replacement. Safety should always come first. A compromised windshield reduces the structural strength of your vehicle and can impair your visibility in dangerous driving conditions.
Regular auto detailing appointments can also help maintain your auto glass between deep cleaning sessions. Professionals have access to industrial-grade glass polishing tools that can restore clarity to cloudy or hazy windshields that home methods cannot fully fix.
Key Takeaways
- Soften first, scrape second: Always use heat or a cleaning solution to loosen debris before scraping to avoid scratches.
- Use the right tools: Razor blades, plastic scrapers, and microfiber cloths work best for different types of residue.
- Avoid harsh chemicals: Ammonia-based cleaners can damage auto glass coatings and rubber seals over time.
- Prevention is key: Applying protective films and regular cleaning stops buildup from becoming a difficult problem.
- Know when to call a pro: Deep scratches or cracks need professional windshield repair, not DIY removal.
- Household items work wonders: Vinegar, baking soda, and WD-40 are affordable and effective for most auto glass problems.
Conclusion
Removing difficult things from your auto glass is a skill every car owner should have. Whether you are dealing with bug splatter, tree sap, old stickers, or paint spots, the right method makes all the difference. Start by identifying the type of mess you are facing. Gather the appropriate tools and cleaning solutions. Follow the step-by-step methods outlined in this guide. And always remember to be gentle with your glass to avoid scratches and damage.
Regular maintenance of your auto glass keeps your windshield clear and your visibility safe. A few minutes of cleaning each week can prevent buildup from turning into a major headache. So keep those microfiber cloths and spray bottles handy. Your windshield will thank you with years of clear, unobstructed views of the road ahead.
Take action today. Pick one of the methods from this guide and give it a try. You will be amazed at how much better your car window glass looks with just a little effort. Safe driving starts with clear vision, and clear vision starts with proper windshield cleaning.
Frequently Asked Questions
Can I use a razor blade to clean my windshield?
Yes, but only with a proper razor blade holder designed for auto glass. Hold the blade flat against the glass at a low angle and apply very little pressure. Always soak the area first with glass cleaner or warm water to soften the debris. Using a bare razor blade without a holder can easily scratch your windshield.
What is the best homemade solution for auto glass cleaning?
A mix of equal parts white vinegar and water works great for most light to moderate grime on your auto glass. For tougher spots, a paste of baking soda and water provides mild abrasion without scratching. Both solutions are affordable, eco-friendly, and safe for your glass and rubber seals.
How do I remove old adhesive from a car window without scratching it?
Start by heating the adhesive with a hair dryer or heat gun to soften it. Then apply a commercial adhesive remover or rubbing alcohol and let it sit for a few minutes. Use a plastic scraper or a microfiber cloth to gently lift the residue away. Repeat the process if needed until all the adhesive is gone.
Will WD-40 damage my auto glass?
WD-40 is safe to use on auto glass when applied correctly. It works well to break down bug splatter, sap, and adhesive residue. However, always rinse the glass thoroughly with a glass cleaner after using WD-40 to remove any oily residue. Leaving it on can cause streaks and attract dust.
How often should I clean my auto glass to prevent buildup?
A quick wipe-down every week keeps most buildup from becoming a serious problem. For deeper cleaning, aim for once a month or more often if you drive frequently on dusty or bug-heavy roads. Regular maintenance makes every future cleaning session much faster and easier.
Can tree sap permanently damage my windshield?
Tree sap itself does not permanently damage glass, but it can etch the surface if left for months or years. The acidic compounds in sap can slowly eat into the glass coating. Removing sap promptly with the methods described in this guide prevents any lasting damage and keeps your auto glass looking clear and new.