How Do You Reset the Warning Light on a Toyota Corolla
Resetting the warning light on a Toyota Corolla is a simple process you can do at home. Whether it is a maintenance light, a check engine indicator, or a dashboard symbol, this guide walks you through every method. You will learn the fastest reset tricks and when to see a mechanic.
That little warning light on your dashboard can really get on your nerves. It pops up out of nowhere and stays there staring at you every time you drive. If you own a Toyota Corolla, you are not alone. Many Corolla owners face this exact situation at some point. The good news is that resetting the warning light on a Toyota Corolla is usually quick and straightforward. You do not need to visit a dealership or spend hundreds of dollars. In this guide, I will walk you through every method step by step. By the end, you will know exactly how to clear those annoying lights and get back to driving with confidence.
## Why Does Your Toyota Corolla Show Warning Lights?
Your Toyota Corolla uses a system of dashboard lights to communicate important information. These lights fall into two main categories. One category tells you about routine maintenance. The other category warns you about something that needs immediate attention. Understanding the difference is key before you try to reset anything.
### Routine Maintenance Lights
These lights remind you about scheduled services. The most common one is the maintenance required light. It typically comes on every 5,000 miles. This light is your Toyota Corolla oil life indicator. It is designed to remind you to change your oil and perform basic upkeep. Resetting this light is perfectly safe and expected after every oil change.
### Critical Warning Lights
These lights alert you to serious problems. The check engine light is the most well-known example. Other critical lights include the oil pressure warning, the battery light, and the brake system alert. You should never simply reset these lights without understanding what triggered them. Ignoring the root cause can lead to expensive damage.
## How to Reset the Maintenance Required Light on a Toyota Corolla
The maintenance required light is the most common light people want to reset on a Toyota Corolla. It is also the easiest to reset. The process is slightly different depending on your model year, but the general idea is the same.
### Method 1: Using the Odometer Button (For Most Model Years)
This method works on most Toyota Corolla models from the early 2000s through the mid-2010s. Here is what you need to do.
- Turn the ignition to the “ON” position. Do not start the engine. Just press the start button without pressing the brake, or turn the key to the “ON” position.
- Locate the odometer button on the dashboard. It is usually on the left side of the instrument cluster.
- Press and hold the odometer button.
- While holding the button, turn the ignition off and then back to the “ON” position.
- Keep holding the button for about 10 seconds.
- The maintenance light should start blinking.
- Release the button. The light is now reset.
This method works because the odometer button gives you access to the trip meter menu. From there, you can navigate to the maintenance reset function. It is a simple and reliable way to clear the light.
### Method 2: Using the Steering Wheel Controls (For Newer Models)
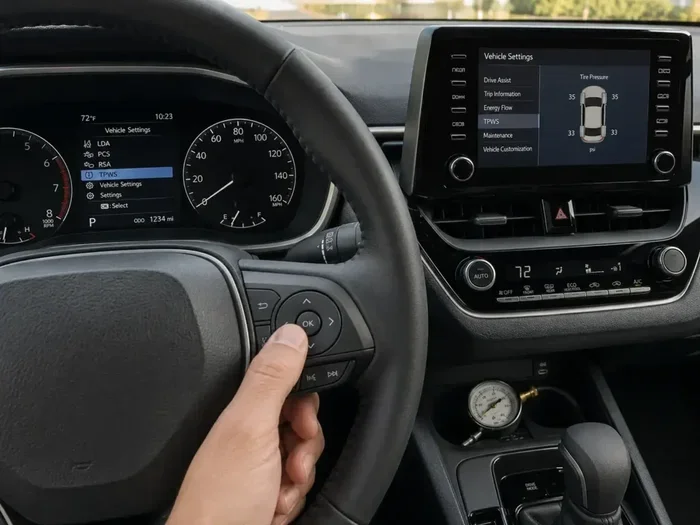
If you drive a newer Toyota Corolla, you likely have steering wheel controls. These make the reset process even easier.
- Turn the ignition to the “ON” position without starting the engine.
- Use the steering wheel arrow buttons to scroll through the dashboard display menu.
- Find the “Maintenance” or “Trip” menu option.
- Select the “Reset” option.
- Hold the OK or confirm button for a few seconds.
- The maintenance light will turn off.
This method is much more intuitive if you are used to navigating digital displays. Newer Toyota models have made this process very user-friendly.
## How to Reset the Check Engine Light on a Toyota Corolla
The check engine light is different from the maintenance light. It is triggered by the onboard diagnostics system, also known as OBD-II. This system monitors your engine, emissions, and other critical components. When it detects a problem, it stores a trouble code and illuminates the check engine light.
### Why the Check Engine Light Comes On
Many things can trigger the check engine light. A loose gas cap is one of the most common causes. Other triggers include faulty oxygen sensors, spark plug issues, and catalytic converter problems. Sometimes it is something minor. Other times it signals a serious issue that needs immediate attention.
### Method 1: Fix the Problem and Drive It Off
The simplest way to reset the check engine light is to fix the underlying problem. Once the issue is resolved, the light will turn off on its own after a few driving cycles. A driving cycle typically means driving for 50 to 100 miles with the engine running normally. This gives the OBD-II system time to recheck all sensors and confirm the problem is fixed.
### Method 2: Use an OBD-II Scanner
If you want to reset the light manually, an OBD-II scanner is your best tool. You can buy a basic scanner for under $30 at any auto parts store. Here is how to use it.
- Locate the OBD-II port under your dashboard. It is usually on the driver side, near the steering column.
- Plug the scanner into the port.
- Turn the ignition to the “ON” position.
- Follow the scanner instructions to read the stored trouble codes.
- Note the codes for your records.
- Use the scanner menu to clear the codes and reset the light.
After clearing the codes, start the engine and take a short test drive. If the light stays off, the reset was successful. If it comes back, the underlying issue is still present and needs to be addressed.
### Method 3: Disconnect the Battery
Some people choose to disconnect the car battery to reset the check engine light. This method works but comes with a caveat. Disconnecting the battery will also reset your radio presets, clock, and other settings. Here is how to do it safely.
- Turn off the engine and all electrical accessories.
- Open the hood and locate the negative battery terminal.
- Use a wrench to loosen the nut on the negative cable.
- Remove the cable from the terminal and let it hang away from the battery.
- Wait for at least 15 minutes.
- Reconnect the cable and tighten the nut.
- Start the engine and check if the light is off.
This method clears all stored codes from the computer. However, it does not fix the actual problem. The light may come back if the issue is not resolved.
## How to Reset Other Dashboard Lights on a Toyota Corolla
Your Toyota Corolla dashboard has more lights than just the maintenance and check engine indicators. Here are a few other common lights and how to handle them.
### Oil Pressure Warning Light
This light looks like an oil can with a drip. If it comes on, it means your oil pressure is low. Check your oil level immediately. If the oil level is low, add oil to the proper level. The light should turn off once the oil pressure returns to normal. If the light stays on even with the correct oil level, you may have a serious problem. In that case, do not continue driving. Tow your vehicle to a mechanic.
### Battery/Charging Warning Light
This light looks like a battery icon. It comes on when there is an issue with your charging system. It could mean a failing alternator, a loose belt, or a bad battery. If this light comes on while driving, pull over safely and turn off the engine. Have your vehicle inspected before driving it again.
### Brake Warning Light
This light is usually red and shaped like a circle with an exclamation mark. It can come on for several reasons. The parking brake might be engaged. The brake fluid level might be low. Or the brake pads might be worn down. Check these items first. If none of them are the issue, have your brakes inspected immediately.
## Common Mistakes People Make When Resetting Warning Lights
Resetting a warning light seems simple, but people make mistakes that cause problems. Here are the most common ones to avoid.
### Resetting Without Fixing the Problem
This is the biggest mistake people make. If your check engine light came on because of a faulty sensor, resetting the light does not fix the sensor. The light will come right back on. Always diagnose the root cause first. Use an OBD-II scanner to read the trouble codes before you reset anything.
### Ignoring Critical Warning Lights
Some people try to reset every light they see. This is a dangerous habit. Critical lights like the oil pressure light, brake light, and battery light are there to protect you and your vehicle. Never reset these lights without understanding what they mean.
### Using the Wrong Reset Method
Not every Toyota Corolla model uses the same reset procedure. Older models use the odometer button method. Newer models use the steering wheel controls. Using the wrong method can confuse you and waste time. Always check your owner manual for the correct procedure for your specific model year.
### Forgetting to Check the Gas Cap
A loose or damaged gas cap is one of the most common reasons for a check engine light. Before you do anything else, check your gas cap. Tighten it until it clicks. Drive for a few miles and see if the light goes away. This simple step can save you a lot of trouble.
## When Should You See a Mechanic Instead of Resetting the Light Yourself?
Resetting the light on your Toyota Corolla is great for routine maintenance alerts. But there are times when you should leave it to the professionals.
If the check engine light is flashing, do not reset it. A flashing check engine light indicates a serious misfire that can damage your catalytic converter. Pull over and call for a tow. If you have checked the oil level, brake fluid, and battery, but warning lights persist, a professional diagnosis is the smart move. A certified Toyota mechanic can read the trouble codes and identify the root cause quickly.
Also, if you have reset the light multiple times and it keeps coming back, that is a clear sign of a deeper problem. Repeated resets without fixing the issue can lead to more expensive repairs down the road.
## How to Prevent Warning Lights from Appearing in the First Place
The best way to deal with warning lights is to prevent them from appearing. Regular maintenance is your number one defense. Follow the Toyota maintenance schedule for your Corolla. Change your oil every 5,000 to 10,000 miles depending on your driving conditions. Check your tire pressure monthly. Inspect your brakes at every oil change.
You should also keep your gas cap tight and replace it if it shows signs of wear. A damaged gas cap can cause the check engine light to illuminate frequently. Finally, address small issues before they become big problems. A minor sensor issue today can become a major repair next month if you ignore it.
## Final Thoughts on Resetting the Warning Light on a Toyota Corolla
Resetting the warning light on a Toyota Corolla is a skill every owner should have. It saves you time and money. It also keeps your dashboard clean and easy to read. Whether you are clearing the maintenance required light after an oil change or using an OBD-II scanner to clear a check engine code, the process is straightforward. Just remember to always address the root cause first. Resetting a light without fixing the problem is only a temporary solution. Keep your Toyota well-maintained, and most warning lights will never become a recurring issue. Drive safe and enjoy your Corolla.
Key Takeaways
- Multiple reset methods exist: You can reset Toyota Corolla lights using the odometer button, the steering wheel controls, or by disconnecting the battery.
- Not all lights should be ignored: Some warning lights signal serious problems that need immediate attention before you reset them.
- Oil life reset is the most common: Most Toyota Corolla owners reset the oil change light after every service.
- You do not need a mechanic: Most dashboard light resets are DIY-friendly and take less than five minutes.
- Check your owner manual: The reset procedure can vary slightly depending on your Corolla model year.
- Recurring lights mean a deeper issue: If a light keeps coming back, have your Toyota inspected by a professional.
Frequently Asked Questions
Can I drive my Toyota Corolla with the check engine light on?
It depends on the situation. If the light is solid and not flashing, you can usually drive a short distance to a safe location. However, if the light is flashing, pull over immediately and stop driving. A flashing check engine light signals a serious problem that can damage your engine. Have the vehicle towed to a mechanic if needed.
How do I know which warning light on my Toyota Corolla is serious?
Red warning lights are generally the most serious. These include the oil pressure light, brake warning light, and battery light. Yellow or orange lights like the check engine light are important but usually not urgent. Still, you should address them as soon as possible to prevent further damage.
Will disconnecting the battery erase all my Toyota Corolla settings?
Yes, disconnecting the battery will reset many of your vehicle’s settings. Your radio presets, clock, and power window calibration may need to be reset. Some models may also need to relearn idle speed after a battery disconnect. Keep this in mind before you choose this method.
How often should I reset the maintenance light on my Toyota Corolla?
You should reset the maintenance light every time you complete an oil change or scheduled service. Most Toyota Corollas require service every 5,000 miles or 6 months, whichever comes first. Resetting the light after each service keeps your maintenance schedule on track.
What should I do if the warning light keeps coming back after I reset it?
If a light returns shortly after you reset it, there is an unresolved issue in your vehicle. Use an OBD-II scanner to read the trouble codes. If you do not have a scanner, visit a mechanic or auto parts store. Many stores will read codes for free. Addressing the root cause is the only way to permanently clear the light.
Do I need any special tools to reset the warning light on a Toyota Corolla?
For most routine lights like the maintenance required light, no special tools are needed. You only need access to the dashboard buttons. However, if you are resetting a check engine light, an OBD-II scanner is very helpful. Basic scanners are affordable and easy to use at home.