How Do I Reset the Check Engine Light on My Toyota
Resetting the check engine light on your Toyota is easier than most people think. You can use an OBD-II scanner, disconnect the battery, or simply tighten a loose gas cap. This guide walks you through every method step by step so you can handle the Toyota check engine light with confidence and save money on dealer visits.
That little yellow engine icon on your dashboard can make anyone’s stomach drop. You are driving your Toyota down the road, everything seems fine, and then — there it is. The check engine light is glowing steady or maybe even flashing. What do you do? Do you pull over immediately? Do you keep driving? More importantly, how do you make it go away?
The good news is that resetting the check engine light on a Toyota is something you can do yourself in most cases. You do not need to be a mechanic or spend hundreds of dollars at the dealer. Whether the light came on because of a loose gas cap or something more serious, this guide will show you exactly what to do. We will cover every method, every tool, and every tip you need to get that annoying dashboard warning off your screen.
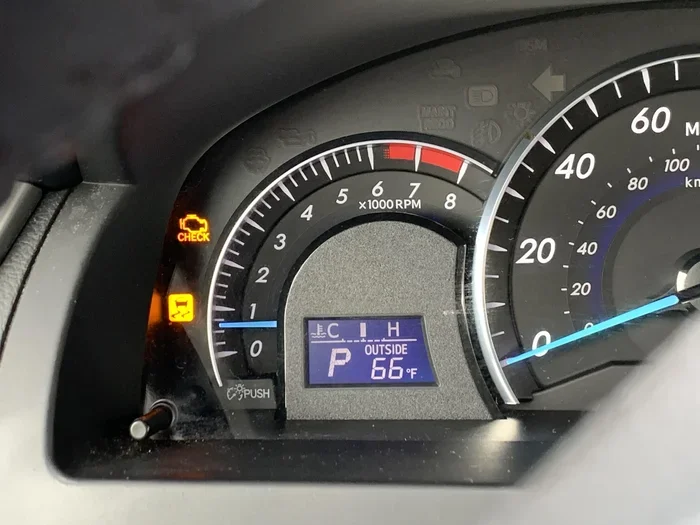
Before we dive in, let us talk about what the Toyota check engine light actually means. This light is part of your vehicle’s onboard diagnostics system. It is officially called the Malfunction Indicator Lamp, or MIL. When your Toyota’s computer detects a problem in the engine, transmission, or emission system, it triggers this light. Think of it as your car’s way of saying, “Hey, something needs attention.” The key is understanding whether the issue is minor or serious before you rush to reset anything.
Key Takeaways
- Multiple reset methods exist: You can use an OBD-II scanner, disconnect the battery, or resolve the underlying issue to clear the light.
- A loose gas cap is the most common cause: Something as simple as a loose fuel cap can trigger the warning on your Toyota dashboard.
- Resetting without fixing the problem is temporary: The light will return if the root cause is not addressed properly.
- Driving cycles help clear codes naturally: Completing a few drive cycles after a repair can turn off the check engine light automatically.
- Know when to see a professional: Flashing lights or serious symptoms require immediate attention from a qualified mechanic.
- Regular maintenance prevents future issues: Following a maintenance schedule keeps your Toyota running smoothly and reduces warning lights.
- An OBD-II scanner is a worthwhile investment: It helps you diagnose problems early and understand what your Toyota is telling you.
📑 Table of Contents
- Understanding the Check Engine Light on Your Toyota
- How to Reset the Check Engine Light on Toyota
- When Should You Not Reset the Check Engine Light?
- Preventing the Check Engine Light from Coming Back
- Tools You Need to Diagnose and Reset the Light
- Can You Drive Your Toyota With the Check Engine Light On?
- Expert Insights: What Mechanics Wish You Knew
- Key Takeaways
Understanding the Check Engine Light on Your Toyota
The check engine light is one of the most misunderstood dashboard indicators. Many Toyota owners panic when they see it, while others ignore it completely. Neither approach is ideal. Let us break down what this light really means and how to read the signals your Toyota is giving you.
What Does the Check Engine Light Look Like?
The light typically shows an engine outline, sometimes with the word “CHECK” or “SERVICE.” On most Toyota models, it appears as a yellow or amber engine shape. The color and behavior of the light tell you a lot about the urgency of the situation.
- Steady yellow light: This means a non-emergency issue has been detected. You can usually drive to a service center safely.
- Flashing red or yellow light: This signals a more serious problem, often related to engine misfires. You should pull over and turn off the engine as soon as it is safe.
- Orange light: Similar to a steady yellow light but sometimes indicates a slightly more urgent issue depending on the Toyota model.
Common Reasons the Check Engine Light Comes On
Understanding what triggers the Toyota check engine light helps you decide how to respond. Here are the most common causes:
- Loose or faulty gas cap: This is the number one reason the light comes on. A loose cap lets fuel vapors escape and triggers the emission system warning.
- Faulty oxygen sensor: The oxygen sensor measures unburned oxygen in your exhaust. When it fails, your Toyota’s fuel efficiency drops and the light comes on.
- Catalytic converter issues: A failing catalytic converter affects your vehicle’s emission control system and can cause the light to illuminate.
- Spark plug or ignition coil problems: Worn spark plugs or bad ignition coils cause misfires that activate the warning.
- Mass airflow sensor failure: This sensor measures the air entering your engine. When it malfunctions, your Toyota’s computer cannot properly balance the fuel mixture.
- EVAP system leak: The evaporative emission control system can develop small leaks that trigger the light.
How to Reset the Check Engine Light on Toyota
Now for the part you have been waiting for — actually resetting the light. There are several methods you can use, ranging from simple fixes to using diagnostic tools. Let us go through each one in detail.
Method 1: Tighten the Gas Cap
Before you do anything else, check your gas cap. This sounds too simple, but it works more often than you would think. A loose or improperly sealed gas cap is the most common reason the check engine light appears on Toyota vehicles. Here is what to do:
- Pull over safely and turn off your Toyota.
- Open the fuel door and locate the gas cap.
- Remove the cap and inspect it for cracks or damage.
- Reinstall the cap and turn it clockwise until you hear three clicks.
- Drive your Toyota for a few minutes and watch the dashboard.
In many cases, the light will turn off on its own after a few drive cycles. If it does not, move on to the next method.
Method 2: Use an OBD-II Scanner
An OBD-II scanner is the most reliable way to reset the check engine light. OBD stands for On-Board Diagnostics, and the scanner reads the diagnostic trouble codes stored in your Toyota’s computer. Here is how to use one:
- Locate the OBD-II port under your Toyota’s dashboard on the driver’s side.
- Plug the scanner into the port.
- Turn the ignition to the “ON” position without starting the engine.
- Wait for the scanner to connect and read the codes.
- Note the codes displayed and look them up in a reference guide.
- Follow the scanner’s menu to clear the codes and reset the light.
OBD-II scanners range from basic code readers to advanced diagnostic tools. You can buy a decent one for under $30 at any auto parts store. Investing in a good scanner pays for itself the first time you diagnose a problem without visiting a mechanic.
Method 3: Disconnect the Battery
Disconnecting your Toyota’s battery resets the entire electrical system, which can clear the check engine light. However, this method comes with caveats. You will lose your radio presets, clock settings, and possibly some learned driving adaptations.
Here is how to do it safely:
- Turn off your Toyota and remove the keys from the ignition.
- Open the hood and locate the negative battery terminal (marked with a minus sign).
- Use a wrench to loosen the cable clamp on the negative terminal.
- Remove the cable and let it sit disconnected for 10 to 15 minutes.
- Reconnect the cable and tighten the clamp securely.
- Start your Toyota and check if the light is off.
Warning: Disconnecting the battery does not fix the underlying problem. If the issue that caused the light is still present, the check engine light will return. This method works best as a temporary solution while you arrange for proper repairs.
Method 4: Complete a Drive Cycle
Toyota vehicles are designed to clear certain codes after a successful drive cycle. A drive cycle is a series of driving conditions that test various systems in your car. Here is a basic drive cycle you can try:
- Start your Toyota with a cold engine.
- Idle the engine for about two minutes.
- Drive at moderate speed (around 55 mph) for five to seven minutes.
- Coast to a stop without braking hard.
- Repeat the process two to three times.
After completing the drive cycle, your Toyota’s computer may recognize that the issue has been resolved and turn off the check engine light automatically. This works best after you have fixed the actual problem that triggered the light.
When Should You Not Reset the Check Engine Light?
Resetting the light feels great, but there are times when you should absolutely not do it. Understanding these situations saves you from bigger problems down the road.
If the Light Is Flashing
A flashing check engine light is a serious warning. It usually indicates an engine misfire that can damage your catalytic converter. If you see a flashing light, do not reset it. Instead, pull over safely and call for assistance. Driving with a flashing engine light can cause expensive damage to your Toyota’s exhaust system.
If You Have Other Warning Lights
If the check engine light comes on along with other warnings like the oil pressure light, temperature gauge in the red, or the battery light, do not reset anything. These combined warnings suggest a serious mechanical issue that needs immediate attention.
If You Do Not Know What Caused the Light
Resetting the light without knowing the cause is like turning off a smoke alarm without checking for fire. The underlying problem still exists and could get worse. Always diagnose the issue first using an OBD-II scanner or by visiting a trusted mechanic.
Preventing the Check Engine Light from Coming Back
Once you have successfully reset the check engine light, you want to keep it off. Prevention is always better than cure, and a few simple habits go a long way in keeping your Toyota healthy.
- Check your gas cap regularly: Make sure it is tight and in good condition. Replace it if you notice cracks or wear.
- Keep up with oil changes: Fresh oil keeps your engine running smoothly and prevents many issues that trigger the light.
- Use quality fuel: Low-quality or contaminated fuel can cause emission problems that activate the warning.
- Address small issues early: Do not ignore minor symptoms like slight rough idling or reduced fuel economy. These often precede bigger problems.
- Follow a regular maintenance schedule: Staying on top of your Toyota’s service intervals helps catch issues before they trigger the check engine light. You can create a personalized schedule that fits your driving habits.
Many Toyota owners find that keeping a basic maintenance log helps them spot patterns. If a particular issue keeps triggering the light, addressing it once and for all saves time and money in the long run.
Tools You Need to Diagnose and Reset the Light
Having the right tools makes the process much easier. Here is what you should consider keeping in your garage or trunk:
OBD-II Scanner
A quality OBD-II scanner is the single most useful tool for Toyota owners. It reads diagnostic codes, shows freeze frame data, and lets you clear codes after repairs. Basic models cost around $20 to $50, while more advanced Bluetooth-enabled scanners connect to your smartphone for real-time data monitoring.
Basic Hand Tools
A simple set of wrenches, a screwdriver, and a pair of pliers can help you address many common issues that trigger the check engine light. A loose hose, a corroded connector, or a worn vacuum line can all be fixed with basic tools.
Multimeter
A digital multimeter helps you test sensors, circuits, and electrical connections. It is especially useful for diagnosing issues with the oxygen sensor, mass airflow sensor, and other electrical components that trigger the warning light.
Can You Drive Your Toyota With the Check Engine Light On?
This is one of the most common questions Toyota owners ask. The answer depends on the situation. A steady check engine light usually means you can drive a short distance to a service center. However, you should avoid highway driving or heavy acceleration until the issue is diagnosed.
If the light is flashing, the answer is clear: do not drive the vehicle. A flashing light indicates a severe misfire that can cause catalytic converter damage within minutes. In this case, call a tow truck and have your Toyota transported to a repair shop.
Some owners wonder whether it is safe to drive with the light on if the vehicle seems to run fine. While a steady light often indicates a less urgent issue, driving with an unresolved problem can lead to decreased fuel efficiency, higher emissions, and potential damage over time. The safest approach is always to diagnose and address the issue promptly.
It is also worth noting that driving with the check engine light on for extended periods can cause your Toyota to fail emissions inspections. If you live in a state that requires annual smog checks, a lit check engine light will result in an automatic failure until the issue is resolved and the light is cleared.
Expert Insights: What Mechanics Wish You Knew
Experienced Toyota mechanics share a few insights that can save you time and money when dealing with the check engine light:
- Do not ignore the light even if it goes off on its own: Sometimes the light turns off after a few drive cycles, but the underlying issue may still exist. Have the codes read even if the light is no longer on.
- Not all code readers are equal: Cheap code readers may only give you a generic description of the problem. Investing in a quality scanner or visiting a shop with professional-grade equipment gives you much more detailed information.
- Clear codes one at a time: If your scanner shows multiple codes, address them in order of severity. Clearing all codes at once without fixing the problems just masks the real issues.
- Keep records of your repairs: Writing down when you cleared the light and what you did helps you track patterns and avoid repeating the same repairs.
Many Toyota owners also find it helpful to learn about their vehicle’s other warning lights. Understanding what each dashboard indicator means helps you respond appropriately and keeps you safe on the road. For example, knowing the difference between the check engine light and the VSC (Vehicle Stability Control) light can prevent unnecessary trips to the mechanic.
Key Takeaways
- The check engine light on your Toyota is a diagnostic tool, not just an annoyance. It is trying to tell you something important about your vehicle’s health.
- Start with the simplest fix: A loose gas cap triggers the light more often than any other cause. Always check it first.
- An OBD-II scanner is your best friend: It gives you the information you need to diagnose and fix problems without guesswork.
- Resetting without fixing is a temporary solution: The light will return if the root cause is not addressed.
- Know when to seek professional help: Flashing lights, multiple warning lights, or serious symptoms require expert attention.
- Prevention saves money: Regular maintenance and prompt attention to small issues keep the check engine light off and your Toyota running strong.
The check engine light does not have to be scary. With the right knowledge and tools, you can diagnose, fix, and reset it yourself in most cases. Your Toyota is a well-engineered machine, and its warning systems are designed to help you catch problems early. Listen to what your car is telling you, take action, and enjoy the confidence that comes from understanding your vehicle.
Remember, if you ever feel unsure about what the light means or how to proceed, there is no shame in visiting a trusted mechanic. A quick diagnostic check can give you peace of mind and save you from costly repairs down the road. Taking care of your Toyota today means enjoying reliable performance for years to come.
Frequently Asked Questions
How much does it cost to reset the check engine light on a Toyota?
If you use an OBD-II scanner yourself, the cost is just the price of the scanner, which ranges from $20 to $100. If you visit a mechanic or dealership, diagnostic fees typically run between $75 and $150. Many auto parts stores offer free code reading services, so you do not always have to pay for diagnostics.
Will disconnecting the battery reset the check engine light on my Toyota?
Yes, disconnecting the battery can reset the light by clearing the stored codes. However, this method does not fix the underlying problem. The light will likely return if the issue is still present. You will also lose some settings like your radio presets and clock, so keep that in mind before you disconnect anything.
Can I drive my Toyota with the check engine light on?
With a steady light, you can usually drive a short distance to a service center. Avoid hard acceleration and highway driving. With a flashing light, you should not drive the vehicle at all. Pull over safely and arrange for a tow to prevent potential engine damage.
How long does it take for the check engine light to reset after fixing the problem?
After you fix the issue, the light usually turns off after two to three successful drive cycles, which can take a few days of normal driving. Using an OBD-II scanner to manually clear the codes will turn off the light immediately, but the codes will return if the problem has not been fully resolved.
What is the most common reason the check engine light comes on in a Toyota?
A loose or faulty gas cap is the most common trigger for the check engine light on Toyota vehicles. Before trying any other fix, check that your gas cap is tight and in good condition. If it is damaged, replacing it is a quick and inexpensive solution that often resolves the issue immediately.
Do I need to take my Toyota to a dealer to reset the check engine light?
No, you do not need to visit a dealer. You can reset the light yourself using an OBD-II scanner or by completing a drive cycle after fixing the problem. Many independent mechanics and auto parts stores can also read and clear codes for you. Visiting a dealer is only necessary if the issue requires specialized Toyota-specific tools or expertise.