How Do I Check the Oil Level in My Oil Tank at Home
Checking your oil level at home is one of the easiest and most important things you can do for your vehicle. With just a dipstick and a few minutes, you can prevent engine damage and keep your car running smoothly. This guide walks you through every step, from preparation to adding oil, so you can handle it like a pro.
Keeping your engine healthy starts with something simple: checking your oil level. Many car owners overlook this basic maintenance task, but it can save you from expensive repairs and unexpected breakdowns. Checking the oil level in your oil tank at home is something anyone can learn to do in just a few minutes. You do not need fancy tools or a mechanic to get it right.
Your engine oil is the lifeblood of your vehicle. It lubricates moving parts, reduces friction, and keeps everything running at the right temperature. When your oil level drops too low, your engine starts working harder. Over time, this leads to wear, overheating, and potentially catastrophic failure. Checking your oil level regularly is the easiest way to catch problems before they become serious.
This guide will walk you through everything you need to know. From understanding your oil tank to reading the dipstick correctly, you will find clear, practical steps you can follow today. We will also cover how often to check, what to do if the level is low, and common mistakes to avoid. By the end, you will feel confident handling this essential maintenance task on your own.
Key Takeaways
- Regular oil checks prevent engine damage: Low oil is one of the leading causes of engine failure, and catching it early saves you thousands.
- You only need a dipstick and a few minutes: The process is simple enough for any car owner to do at home without professional help.
- Check oil when the engine is cool: For the most accurate reading, always check your oil level when the engine is off and cool.
- Know your oil type and capacity: Using the wrong oil or overfilling can cause serious problems for your engine.
- Reset your oil change light after maintenance: If you recently changed your oil, you may need to reset the indicator to keep your dashboard accurate.
- Never ignore warning signs: If your oil light comes on, address it immediately to avoid breakdowns and expensive repairs.
📑 Table of Contents
- Understanding Your Oil Tank and Why It Matters
- Tools You Need to Check Oil Level at Home
- Step-by-Step Guide to Checking Oil Level at Home
- Common Signs of Low Oil Level
- How Often Should You Check Your Oil Level?
- Maintaining Proper Oil Levels
- Common Mistakes to Avoid When Checking Oil
- Expert Tips for Better Oil Maintenance
- Conclusion
Understanding Your Oil Tank and Why It Matters
Before you grab a rag and pop the hood, it helps to understand what you are working with. Your vehicle has an oil tank, also called an oil reservoir, that stores the engine oil. This tank feeds oil through the engine to keep all the moving parts properly lubricated. Knowing how your oil system works makes the checking process much easier.
What Is an Oil Tank?
The oil tank is a sealed container located in your engine bay. It holds the engine oil when the vehicle is not running. Most modern cars have a capacity ranging from four to eight quarts of oil, depending on the engine size. The tank includes a dipstick tube that lets you measure the current oil level. Some newer vehicles use electronic sensors instead of a traditional dipstick, but the purpose is the same.
The oil in your tank does more than just lubricate. It also cleans engine components, prevents rust, and helps cool the engine by carrying heat away from critical parts. Over time, oil breaks down and loses its effectiveness. That is why checking the level and quality of your oil matters so much for long-term engine health.
Why Checking Oil Level Is Important
Low oil level is one of the most common causes of engine damage. When there is not enough oil, metal parts grind against each other. This creates heat and friction that can warp or seize engine components. In worst cases, a completely dry engine will lock up and need a full replacement.
On the other hand, too much oil can also cause problems. Overfilling the oil tank creates excess pressure inside the engine. This can lead to oil leaks, foaming, and reduced lubrication. Checking your oil level regularly helps you stay in the sweet spot between too little and too much.
Tools You Need to Check Oil Level at Home
Good news: you do not need a lot of tools to check your oil level. Most of what you need is already in your vehicle. Here is a quick list of items to have on hand before you start.
The Dipstick
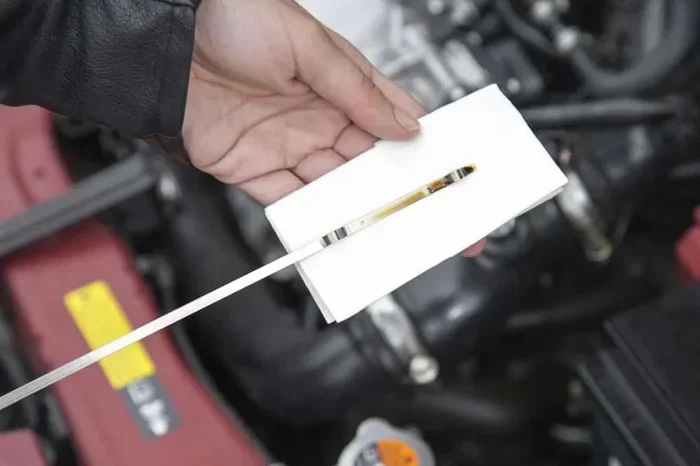
Every car with a traditional oil system comes with a dipstick. This is a long, thin metal rod with markings that show the oil level. The dipstick slides into the oil tank, and when you pull it out, the oil residue on the rod tells you how much oil is present. Most dipsticks have two marks: a minimum line and a maximum line. Your oil level should fall between these two lines.
If you are not sure where your dipstick is located, check your vehicle owner manual. The manual will also tell you the recommended oil type and capacity for your specific model. Always use the oil type specified by your manufacturer to avoid compatibility issues.
Electronic Oil Level Sensors
Some newer vehicles, especially certain Toyota and hybrid models, use electronic oil level sensors instead of a traditional dipstick. These sensors send oil level data to your dashboard display. You can usually check the oil level through the vehicle information screen. If your car has this system, consult your owner manual for the specific steps to view the oil level reading.
Even with electronic sensors, it is still a good idea to understand the basics of oil maintenance. Sensors can malfunction, and having a general understanding of your vehicle helps you notice when something is off.
Step-by-Step Guide to Checking Oil Level at Home
Now that you know what you are working with, let us walk through the actual process. Following these steps ensures you get an accurate reading every time.
Step 1: Prepare Your Vehicle
Start by parking your car on a flat, level surface. This is crucial because an uneven surface can give you a false reading. Turn off the engine and let the vehicle sit for at least five to ten minutes. This allows the oil to settle back into the oil tank for an accurate measurement.
Some experts recommend checking oil when the engine is warm, as this lets the oil flow more freely and drain back completely. However, checking when the engine is cool is safer and avoids the risk of burns from hot engine components. For most drivers, checking oil when the engine is cool and the car has been sitting for a few minutes is the safest approach.
Step 2: Locate the Dipstick
Open the hood and find the dipstick handle. It is usually brightly colored, often yellow or orange, so it is easy to spot. The dipstick tube is typically located near the front of the engine. Pull the dipstick straight out and wipe it clean with a rag or paper towel.
Hold the dipstick horizontally and look at the tip. You will see two marks or holes that indicate the minimum and maximum oil levels. Some dipsticks have crosshatched patterns instead of lines. Either way, the oil residue on the dipstick should fall between these indicators.
Step 3: Read the Oil Level
After wiping the dipstick clean, reinsert it fully into the tube. Push it all the way in, then pull it back out again. Now look at the oil residue on the end of the dipstick. The level should be between the minimum and maximum marks.
If the oil level is close to or below the minimum line, you need to add oil. If it is above the maximum line, you have overfilled the tank and should consider having some oil removed. Never let your oil level drop below the minimum mark for extended periods, as this can cause serious engine damage.
Step 4: Add Oil If Needed
If your oil level is low, you will need to add more oil. First, locate the oil fill cap on top of the engine. It usually has an oil can symbol on it. Remove the cap and pour in small amounts of the recommended oil type. Use a funnel to avoid spills.
After adding oil, wait a minute for it to settle, then recheck the level with the dipstick. Add oil gradually until the level reaches the full mark but does not exceed it. Replace the oil fill cap when you are done. Always double-check your oil level after adding oil to make sure you did not overfill the tank.
Common Signs of Low Oil Level
Sometimes you do not need to open the hood to know your oil level is low. Your vehicle gives you several warning signs. Recognizing these early can prevent serious engine damage.
Warning Lights and Gauges
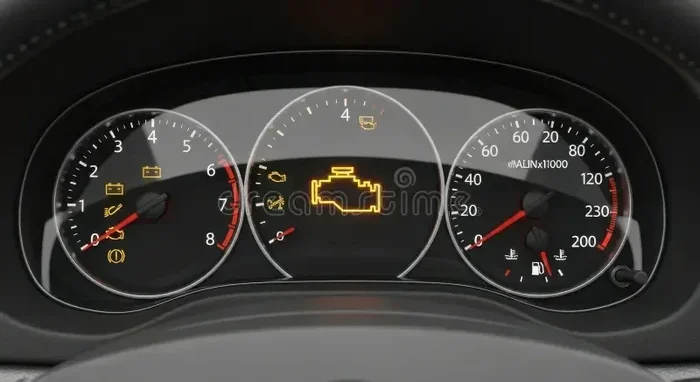
The most obvious sign is the oil pressure warning light on your dashboard. This light usually looks like an old oil can symbol. If it comes on while you are driving, pull over safely and check your oil level immediately. Ignoring this light can lead to engine failure within minutes.
Some vehicles also have an oil level gauge on the dashboard display. This digital readout gives you a more precise idea of your current oil level. If you notice the gauge dropping below the normal range, it is time to check the oil tank manually.
Physical Symptoms of Low Oil
Your vehicle may show physical symptoms when the oil level is low. Unusual engine noises, such as knocking or ticking sounds, are common indicators. You might also notice reduced engine performance or a burning smell coming from the engine bay.
If you see dark smoke from the exhaust, this could mean oil is leaking into the combustion chamber. Any of these signs warrant an immediate oil check. Do not wait if you notice these symptoms because low oil can cause permanent engine damage quickly.
It is also worth noting that some vehicles use more oil than others. If you find yourself needing to add oil frequently, this could indicate an underlying issue like an oil leak or excessive oil consumption. In that case, it is best to have a professional inspect your vehicle.
How Often Should You Check Your Oil Level?
Now that you know how to check your oil, you might wonder how often you should do it. The answer depends on your vehicle, driving habits, and the type of oil you use.
Monthly Checks
As a general rule, you should check your oil level at least once a month. This is especially important for older vehicles or those with higher mileage. Monthly checks give you a baseline and help you spot trends early. For example, if you notice the oil level dropping faster than usual, you can investigate before it becomes a serious problem.
Make it a habit to check your oil at the same time each month. Some people tie it to a regular schedule, like the first Saturday of every month. This consistency helps you stay on top of maintenance without having to think about it.
Seasonal Considerations
Oil levels can fluctuate with temperature changes. In colder weather, oil becomes thicker and may not flow as easily. In hot weather, oil can thin out and burn off faster. If you live in an area with extreme temperature swings, you may want to check your oil more frequently during seasonal transitions.
Also, if you are planning a long road trip, check your oil level before you go. A pre-trip oil check is one of the simplest ways to prevent breakdowns on the road. You can also check your oil after any major service or oil change to make sure everything looks correct.
Maintaining Proper Oil Levels
Checking your oil level is just one part of the equation. Proper oil maintenance also involves using the right type of oil, following a regular change schedule, and understanding what your dashboard warnings mean.
Choosing the Right Oil
Not all engine oils are the same. Oils come in different viscosities, such as 5W-30, 10W-40, and synthetic blends. The right oil for your vehicle depends on the engine design, climate, and driving conditions. Always refer to your owner manual for the manufacturer recommended oil type.
Using the wrong oil can affect engine performance and longevity. For example, using a thicker oil in a cold climate can make it harder for the engine to start. Similarly, using conventional oil when synthetic is recommended may lead to faster breakdown. If you are unsure about which oil to use, your local dealership or auto parts store can help you find the right one for your vehicle.
Oil Change Schedule
Checking oil level and changing your oil are two different maintenance tasks. While you check the level regularly, you also need to replace the oil entirely at recommended intervals. Most manufacturers recommend changing conventional oil every 3,000 to 5,000 miles and synthetic oil every 7,500 to 10,000 miles.
However, these are general guidelines. Always follow the schedule outlined in your vehicle owner manual. If you are unsure about when your last oil change was, checking the oil level and condition can give you clues. Dark, gritty oil is a sign that it is time for a change. And after you complete an oil change, remember to reset your oil change indicator if your vehicle has one. Resetting the light ensures your dashboard remains accurate and helps you keep track of your maintenance schedule.
What to Do When the Oil Light Comes On
If your oil warning light comes on, do not ignore it. Pull over safely and turn off the engine. Check the oil level using the dipstick. If the oil is low, add the recommended oil type immediately. If the oil level is fine but the light is still on, the issue could be with the oil pressure sensor or the oil pump.
In any case, if the oil light stays on after you add oil, have your vehicle towed to a service center. Driving with low oil pressure can destroy your engine in a matter of minutes. It is always better to be safe than sorry when it comes to oil-related warnings. For more information about driving with warning lights, you can read about whether you can still drive with the oil change light on.
Common Mistakes to Avoid When Checking Oil
Even a simple task like checking oil can go wrong if you are not careful. Here are some common mistakes to watch out for.
- Checking oil while the engine is running: This gives an inaccurate reading because the oil is still circulating. Always turn off the engine and wait a few minutes first.
- Not reading the dipstick on level ground: If your car is parked on a slope, the oil will shift to one side and give a false reading.
- Overfilling the oil tank: Adding too much oil creates pressure inside the engine and can cause leaks or damage to the catalytic converter.
- Using the wrong oil type: Always match the oil to your vehicle specifications. Using the wrong viscosity can reduce engine protection.
- Skipping oil changes: Checking the oil level is not enough. Old, degraded oil loses its lubricating properties and needs to be replaced on schedule.
Avoiding these mistakes keeps your oil system working properly and extends the life of your engine. Small habits make a big difference when it comes to vehicle maintenance.
Expert Tips for Better Oil Maintenance
Here are some pro tips that experienced mechanics and longtime car owners swear by. These simple habits can help you get the most out of your engine oil and oil tank.
First, always keep a record of your oil checks. Write down the date, the oil level reading, and any observations about oil color or consistency. This log helps you spot trends over time and gives you valuable information if you ever need to visit a mechanic.
Second, keep extra oil in your trunk. You never know when you might need to top off between service appointments. Make sure the extra oil matches the type already in your engine. This is a small preparation step that can save you from a roadside emergency.
Third, pay attention to your driving conditions. If you frequently drive in stop-and-go traffic, tow heavy loads, or operate in extreme temperatures, your oil may degrade faster. In these cases, consider checking your oil level more frequently and changing your oil more often than the standard schedule suggests.
Finally, do not hesitate to consult your owner manual or a trusted mechanic if you are ever unsure. Every vehicle is different, and the manual is your best resource for model-specific maintenance advice. Staying proactive with oil maintenance is one of the best investments you can make in your vehicle.
Conclusion
Checking the oil level in your oil tank at home is one of the simplest yet most impactful things you can do for your vehicle. It takes just a few minutes, requires minimal tools, and can prevent costly engine repairs down the road. By following the steps outlined in this guide, you will feel confident handling this essential maintenance task on your own.
Remember to check your oil regularly, use the right type of oil, and never ignore warning signs from your vehicle. A little attention to your oil level today can save you from major headaches tomorrow. Make oil checking a part of your routine, and your engine will thank you for years to come.
Stay proactive about your vehicle maintenance. Whether you are checking oil levels, resetting warning lights, or planning your next oil change, every small step adds up to a healthier, longer-lasting car. Keep this guide handy, and you will always know exactly where your oil level stands.
Frequently Asked Questions
How do I know if my oil level is low?
The most common sign is the oil pressure warning light on your dashboard. You may also notice engine knocking, reduced performance, or a burning smell. The best way to confirm is to pull out the dipstick and check the oil level against the minimum and maximum marks. If the oil is below the minimum line, you need to add oil right away.
Can I check my oil level while the engine is running?
No, you should always turn off the engine and let it sit for a few minutes before checking the oil. Checking oil while the engine is running gives an inaccurate reading because the oil is still circulating through the engine. Wait for the oil to settle back into the oil tank for the most accurate measurement.
What happens if I overfill my oil tank?
Overfilling the oil tank creates excess pressure inside the engine. This can lead to oil leaks, foaming, and reduced lubrication. In severe cases, excess oil can damage the catalytic converter or cause white smoke from the exhaust. If you accidentally overfill, have the excess oil removed by a professional.
How often should I change my engine oil?
The answer depends on your vehicle and the type of oil you use. Conventional oil typically needs to be changed every 3,000 to 5,000 miles, while synthetic oil can last 7,500 to 10,000 miles. Always refer to your vehicle owner manual for the manufacturer recommended oil change interval.
Do I need to reset the oil change light after adding oil?
You only need to reset the oil change light if you have completed a full oil change, not just topped off the oil level. Resetting the light ensures your maintenance reminder stays accurate. If you are unsure how to reset yours, check your owner manual or look up the specific steps for your vehicle model.
Can I use any type of oil for my vehicle?
No, you should always use the oil type recommended by your vehicle manufacturer. Different engines require different viscosities and formulations. Using the wrong oil can reduce engine protection and potentially cause damage. Check your owner manual or ask a professional if you are not sure which oil is right for your car.