Understanding the Hood Release Latch and How It Works
The hood release latch is the small but essential mechanism that lets you open your car’s hood to access the engine. It works through a simple cable and lever system that connects the interior handle to the latch under the hood. Understanding how your hood release latch works can help you troubleshoot problems and avoid costly repairs.
The hood release latch is one of the most important parts of your car that you probably never think about. It is the small mechanism that lets you pop open your hood and access the engine. Without a working hood release latch, you cannot check your oil, add coolant, or inspect belts and hoses. A hood release latch might seem simple, but it involves several parts working together in harmony. In this guide, we will break down everything you need to know about your hood release latch, from how it works to common fixes.
Now that you know what a hood release latch does, let us talk about why it matters. Every single time you open your car’s hood, you rely on this little device. Whether you are a daily commuter or someone who only drives on weekends, the hood release latch is always there doing its job. Most drivers take it for granted until something goes wrong.
A hood latch malfunction can turn a simple maintenance task into a real headache. You might find yourself standing in a parking lot with a hood that will not open. Understanding how your hood release mechanism works can help you avoid those frustrating moments. Let us dive into the details.
Key Takeaways
- What It Does: The hood release latch is the primary mechanism that allows you to open and secure your car’s hood.
- How It Works: It uses a cable, lever, and spring system connected from the driver’s cabin to the latch under the hood.
- Common Problems: Stuck latches, broken cables, and worn springs are the most frequent issues drivers face.
- DIY Fixes: Many hood latch repair tasks can be done at home with basic tools and a little patience.
- Replacement Costs: A hood latch replacement typically costs between $50 and $200, depending on your vehicle.
- Maintenance Matters: Regular cleaning and lubrication can extend the life of your hood release latch by years.
📑 Table of Contents
What Is a Hood Release Latch?
The hood release latch is the locking device that holds your car’s hood securely closed while you drive. It is located at the front of the engine bay, usually near the center of the vehicle. When you pull the release handle inside your car, a cable pulls the latch open, allowing the hood to lift.
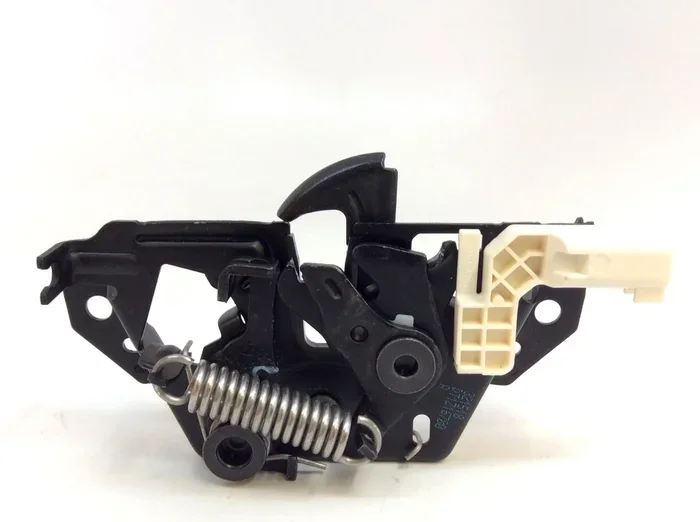
Most people think the hood release latch is just one piece. In reality, it is a small assembly made up of several components. These include the latch itself, a spring, a locking pin, and sometimes a secondary safety latch. Together, these parts keep your hood locked tight during driving and let you open it easily when needed.
Where Is the Hood Latch Located?
The hood latch location is typically found at the front edge of the engine bay. On most vehicles, you can see it when you look up under the hood near the center. The latch is attached to the frame of the car and the hood itself. The hood release cable runs from the interior handle down to this latch point.
Finding your hood latch location is easy. Just open the hood and look for a metal piece that hooks onto the hood edge. You will usually see a spring and a locking mechanism nearby. If you are having trouble locating it, check your vehicle’s owner manual for a diagram.
What Are the Main Parts of the Hood Release Latch?
The hood latch assembly consists of a few key parts. The latch body is the main piece that grabs the hood. Inside, a hood latch spring provides the tension needed to keep the latch locked. The locking pin slides into place to secure the hood fully.
Another important part is the hood release cable. This cable connects the interior hood release handle to the latch under the hood. When you pull the handle, the cable tugs on the latch, releasing it. Some vehicles also have a secondary hood latch, which acts as a safety feature to prevent the hood from flying open while driving.
How the Hood Release Latch System Works
Understanding how your hood release latch works is simpler than you might think. The system is designed to be straightforward and reliable. It relies on a pull-cable mechanism that transfers force from inside your car to the latch under the hood.
The Step-by-Step Process of Opening the Hood
Here is how the hood release mechanism works when you open your hood:
- You pull the hood release handle inside your car, usually located on the driver’s side floorboard or near the steering column.
- This action pulls the hood release cable, which is a thin metal cable enclosed in a protective sheath.
- The cable slides forward and tugs on the latch pin under the hood.
- The latch pin retracts, releasing the lock on the hood.
- You go to the front of the car, push the hood up slightly, and release the secondary latch to fully open the hood.
- The hood prop rod or hydraulic strut holds the hood open while you work.
Each step depends on the previous one. If any part of this chain fails, the whole system stops working. That is why understanding each component matters.
What Is the Secondary Hood Latch?
The secondary hood latch is a safety feature found on most modern cars. It is a small catch that holds the hood in place even after the primary latch is released. This prevents the hood from accidentally popping open while you are driving.
To release the secondary latch, you usually need to reach under the front edge of the hood and push or pull a small lever. The exact hood latch location of the secondary latch varies by vehicle model. Some cars use a push-button system instead of a lever.
Expert Insight: Many drivers do not realize their car has a secondary hood latch until the primary one fails. Familiarize yourself with both latches on your vehicle. It can save you a lot of stress in an emergency.
Common Problems with the Hood Release Latch
Like any mechanical part, the hood release latch can develop problems over time. Most issues are caused by wear, corrosion, or lack of maintenance. Knowing the warning signs can help you catch problems early.
Hood Latch Stuck Closed
A hood latch stuck closed is one of the most common problems. This happens when the latch mechanism freezes or the cable breaks. Cold weather is a major cause, as moisture inside the latch can freeze and lock the mechanism in place.
Another cause is a stretched or frayed hood latch cable. Over time, the cable can wear out and lose its tension. When this happens, pulling the release handle inside the car may not generate enough force to open the latch. You might feel the handle pull loose without any response from the hood.
Hood Latch Stuck Open
On the flip side, a hood latch stuck open can also be a problem. This usually happens when the hood latch spring breaks or the latch assembly wears out. A hood that will not stay closed is a serious safety hazard while driving.
If your hood keeps popping open, check the spring tension first. A weak spring cannot hold the latch firmly in place. You may also need to inspect the locking pin for damage or debris.
Loose or Frayed Hood Release Cable
The hood release cable is the most vulnerable part of the system. It is exposed to road conditions, moisture, and constant movement. Over time, the cable can fray, stretch, or even snap completely.
Signs of a failing cable include a loose or spongy feeling when you pull the handle. You might also notice that the hood does not respond immediately after pulling the release. If you see any exposed wire near the cable housing, it is time for a hood latch repair.
Quick Tip: If your hood latch stuck problem happens in winter, try pouring warm (not boiling) water over the latch area. This can melt ice and free up the mechanism temporarily until you can perform a proper repair.
Rust and Corrosion Buildup
Rust is the silent killer of many car parts, and the hood latch assembly is no exception. Road salt, rain, and moisture can cause the latch components to corrode over time. Rust can bind the moving parts of the latch, making it stiff or completely immobile.
Regularly inspecting the latch area for rust can prevent bigger problems down the road. A quick wipe-down and application of a protectant can go a long way in preventing corrosion.
How to Fix a Stuck or Broken Hood Release Latch
Many hood latch repair tasks can be done at home with basic tools. Before you call a mechanic, try these troubleshooting steps. Always make sure your car is parked on a flat surface and the engine is off.
Fixing a Hood Latch Stuck Closed
If your hood latch stuck closed, start by checking the cable. Have a friend pull the release handle inside the car while you watch the latch area under the hood. If the cable moves but the latch does not, the problem is likely inside the latch assembly itself.
Try spraying a penetrating lubricant like WD-40 directly into the latch mechanism. Let it sit for a few minutes, then try pulling the release again. Often, this simple step is enough to free a stuck hood release latch.
If lubricant does not work, you may need to manually push the latch pin open. Use a flathead screwdriver or a pair of pliers to gently push the pin to the side. This releases the lock and lets you lift the hood.
Common Mistake: Do not force the hood open by lifting it hard. This can damage the latch, the hood edge, or the hinges. Always identify and fix the root cause first.
Replacing a Broken Hood Release Cable
A broken hood latch cable is one of the most common reasons a hood release latch stops working. Replacing the cable is a manageable DIY job for most car owners.
First, you need to find the correct replacement cable for your vehicle. Check your owner’s manual or search online using your car’s make, model, and year. The hood latch cable is usually inexpensive, costing between $10 and $30 for most vehicles.
To replace the cable, you need to disconnect the old one from both the handle and the latch. Remove the mounting bolts, route the new cable through the same path, and reconnect it at both ends. Test the handle before closing the hood to make sure the cable pulls smoothly.
Adjusting a Loose Hood Release Latch
Sometimes the problem is not a broken part but a loose hood latch adjustment. If your release handle feels sloppy or the hood does not latch firmly, a simple adjustment might fix it.
Most hood release latch systems have an adjustment bolt or nut where the cable connects to the latch. Tightening this can restore proper tension. Make small adjustments and test the handle after each change. You want the latch to feel firm but not overly tight.
| Problem | Likely Cause | DIY Fix? | Estimated Cost |
|---|---|---|---|
| Hood will not open | Broken cable or frozen latch | Yes (lubricant or cable replacement) | $10 – $50 |
| Hood will not stay closed | Broken spring or worn latch | Sometimes (spring replacement) | $15 – $75 |
| Loose or spongy release handle | Cable stretch or misalignment | Yes (cable adjustment) | Free – $20 |
| Hood opens by itself while driving | Failed secondary latch | No (seek professional help) | $50 – $200 |
Hood Release Latch Replacement: What to Expect
Sometimes a hood latch repair is not enough, and you need a full replacement. Knowing what to expect can help you budget and plan ahead. The cost and complexity depend on your vehicle’s make and model.
OEM vs Aftermarket Hood Release Latches
When it comes to hood latch replacement, you have two main options: OEM (Original Equipment Manufacturer) parts and aftermarket parts. OEM parts are made by the same company that built your car. They are designed to fit perfectly and match the original quality.
Aftermarket parts are made by third-party manufacturers. They are usually cheaper but can vary in quality. Here is a quick comparison:
| Feature | OEM Latch | Aftermarket Latch |
|---|---|---|
| Price Range | $30 – $150 | $15 – $80 |
| Fit and Finish | Perfect match | Varies by brand |
| Durability | High | Moderate to high |
| Warranty | Usually included | Varies |
| Availability | Dealer networks | Widely available online |
For most drivers, an aftermarket hood release latch works just fine. Just make sure to buy from a reputable brand with good reviews. If you want the exact original fit and do not mind paying more, go with OEM.
How Much Does Hood Latch Repair Cost?
The hood latch repair cost depends on what needs fixing. A simple cable replacement is one of the cheapest repairs, usually under $50 if you do it yourself. If you take it to a shop, labor adds $50 to $100.
A full hood latch assembly replacement costs more. The part itself ranges from $30 to $150, and labor at a shop can add $100 to $200. On luxury or specialty vehicles, parts and labor can be even higher.
Doing the repair yourself can save you a significant amount of money. Most hood latch replacement jobs take about 30 minutes to an hour, and the steps are well-documented in vehicle repair manuals and online tutorials.
Tips for Maintaining Your Hood Release Latch
Prevention is always better than repair when it comes to your hood release latch. A little regular maintenance can keep the system working smoothly for years. Here are some simple habits that make a big difference.
Clean and Lubricate Regularly
Dirt, grime, and moisture are the biggest enemies of your hood latch mechanism. Every few months, open the hood and inspect the latch area. Use a damp cloth to wipe away any dirt or debris. Then apply a small amount of silicone-based lubricant to the moving parts.
Avoid using heavy grease, as it can attract dust and cause buildup over time. A light spray of lubricant keeps the latch operating smoothly without creating a mess. This simple step can extend the life of your hood release latch significantly.
Check the Cable Tension
The hood release cable can stretch or wear over time. Periodically check that the cable has proper tension. The release handle should feel firm and responsive, not loose or spongy.
If you notice any slack in the cable, adjust it right away. A loose cable puts extra strain on the latch mechanism and can lead to premature wear. Catching this early can save you from a complete cable failure later.
Inspect for Rust and Wear
Take a close look at the latch assembly every time you open the hood. Look for signs of rust, cracks, or excessive wear on the spring and locking pin. Catching rust early lets you treat it before it causes a hood latch malfunction.
If you live in an area that uses road salt in winter, inspect the latch more frequently. Salt accelerates corrosion and can cause serious damage to metal components. A quick rinse of the under-hood area during car washes can help prevent this.
Expert Insight: Many experienced mechanics recommend applying a thin coat of white lithium grease to the latch components once a year. This creates a protective barrier against moisture and keeps the mechanism operating smoothly in all weather conditions.
Do Not Ignore Warning Signs
Your car usually gives you warning signs before a hood release latch completely fails. A sticky handle, a clicking sound when you pull the release, or a hood that does not latch firmly are all red flags. Do not ignore these signs.
Addressing small problems early prevents them from becoming big, expensive repairs. A few minutes of attention now can save you from being stranded with a hood that will not open when you need it most.
Conclusion
The hood release latch is a small but vital part of your vehicle. It gives you access to the engine and keeps your hood securely closed while driving. Understanding how it works, recognizing common problems, and performing basic maintenance can save you time and money.
Most issues with the hood release latch are easy to fix with basic tools and a little know-how. Whether you need to lubricate a sticky latch, replace a frayed cable, or swap out the entire assembly, the steps are straightforward. Regular maintenance keeps your hood latch mechanism in top shape and prevents unexpected breakdowns.
Take a few minutes to familiarize yourself with your car’s hood release latch system. Check it regularly, address small issues promptly, and you will have a reliable hood latch for years to come. Your future self will thank you the next time you need to pop the hood in a pinch.
Frequently Asked Questions
How do I know if my hood release latch is broken?
Signs of a broken hood release latch include a loose or unresponsive release handle, a hood that will not open or stay closed, and unusual clicking or grinding sounds when you pull the handle. If you notice any of these symptoms, inspect the latch and cable for damage or wear.
Can I drive with a broken hood release latch?
It is not recommended. A broken hood release latch means you cannot access the engine for basic checks like oil and coolant levels. More importantly, if the hood is not secured properly, it could open while driving, which is extremely dangerous. Get the latch repaired as soon as possible.
What causes a hood release cable to break?
The most common causes are normal wear and tear, corrosion from moisture and road salt, and repeated stretching over time. The cable is exposed to the elements and experiences constant movement every time you open or close the hood. Regular lubrication and inspection can help prevent premature cable failure.
How much does it cost to replace a hood release latch?
The hood latch repair cost varies depending on the issue. A cable replacement typically costs $10 to $50 for the part. A full hood latch assembly replacement ranges from $30 to $150 for the part, plus $100 to $200 for labor if done at a shop. DIY repairs can save you a significant amount of money.
Can I use WD-40 on my hood release latch?
Yes, WD-40 is a great penetrating lubricant for freeing a stuck hood release latch. Spray it directly into the latch mechanism and let it sit for a few minutes before trying to open or close the hood. However, WD-40 is not a long-term lubricant. For ongoing maintenance, use a silicone-based lubricant or white lithium grease instead.
Is it hard to replace a hood release latch yourself?
For most vehicles, replacing a hood release latch is a straightforward DIY project. You typically need basic hand tools like a socket set and screwdrivers. The process involves removing the old cable and latch, installing the new parts, and adjusting the cable tension. Online tutorials and your vehicle’s repair manual can walk you through the steps specific to your car model.