Can I Change the Brake Pads Myself Without a Mechanic
Yes, you can change the brake pads yourself without a mechanic if you have the right tools and a little patience. This guide walks you through the entire brake pad replacement process, from removing old pads to installing new ones. We will cover the tools you need, safety tips, and common mistakes to avoid.
Have you ever wondered, can I change the brake pads myself? The short answer is yes. Changing brake pads is one of the most common DIY car maintenance tasks. You do not need to be a mechanic to do it right. With the right tools and a little guidance, you can save both time and money. This guide will walk you through every step of the process.
Brake pads wear down over time. That is just how the brake system works. Every time you press the brake pedal, the pads press against the rotor. This creates friction that slows your car. Over thousands of miles, that friction wears the pads thinner. When they get too thin, they need replacing. Ignoring worn brake pads is dangerous. It can increase your stopping distance and damage your rotors.
Many car owners spend hundreds of dollars at the shop for a simple brake pad swap. But here is the truth. You can do this job in your driveway with basic tools. The entire process takes about one to two hours per axle. Let us break down exactly how to do it safely and correctly.
Key Takeaways
- DIY Brake Pad Replacement Is Doable: Most people with basic car knowledge can change their own brake pads safely.
- You Will Need Specific Tools: A jack, lug wrench, C-clamp, and socket set are essential for the job.
- Brake Pad Types Matter: Ceramic, semi-metallic, and organic pads each have different performance and noise levels.
- Safety Comes First: Always work on a flat surface and use jack stands for support.
- Cost Savings Are Real: Doing it yourself can save you $100 to $300 compared to a mechanic.
- Know When to Call a Pro: If your brake rotors are warped or your brake lines are damaged, seek professional help.
📑 Table of Contents
- Why You Should Learn to Change Brake Pads Yourself
- Tools and Materials You Will Need
- Step-by-Step Guide to Changing Brake Pads
- Types of Brake Pads: Which One Should You Choose?
- Common Mistakes to Avoid When Changing Brake Pads
- When Should You See a Mechanic Instead?
- Brake Pad Replacement Cost: DIY vs. Mechanic
- Brake Pad Maintenance Tips for Longer Life
- Final Thoughts on DIY Brake Pad Replacement
Why You Should Learn to Change Brake Pads Yourself
There are many reasons to learn how to change brake pads on your own. First, it saves you money. Mechanics charge for labor, and brake pad replacement is not complicated. Second, it gives you control over the quality of parts you use. Third, it builds your confidence as a car owner. Once you have done it once, you will feel more comfortable working on your vehicle.
Let us look at the main benefits of DIY brake pad replacement:
- Cost Savings: Brake pads alone cost between $30 and $100 per axle. A shop might charge $150 to $300 for parts and labor combined.
- Convenience: You can work on your schedule. No need to wait for an appointment or shuttle service.
- Learning Experience: Understanding your brake system helps you spot other issues early.
- Confidence Boost: Completing a repair yourself makes future projects feel less intimidating.
- Better Parts Selection: You can choose the exact brake pad type and brand that fits your needs.
How Often Do Brake Pads Need Replacement?
Brake pad lifespan varies depending on driving habits and conditions. Most brake pads last between 25,000 and 70,000 miles. City drivers tend to wear pads faster because of frequent stopping. Highway drivers usually get more life out of their pads. The brake pad wear indicator is a small metal tab that makes a squealing noise when pads are thin. If you hear this sound, it is time to check your pads.
You can also measure brake pad thickness yourself. Most pads have a wear slot on the side. Use a flashlight and a ruler to check the remaining material. If the friction material is less than a quarter-inch thick, replace them soon. Waiting too long can cause metal-to-metal contact, which damages the brake rotor and costs more to fix.
Tools and Materials You Will Need
Before you start, gather everything you need. Having the right tools makes the job smoother and safer. You do not need anything exotic or expensive. Most of these items are available at any auto parts store.
Essential Brake Pad Tools
Here is a list of the basic tools required for brake pad removal and installation:
- Jack and Jack Stands: You need to lift the vehicle safely. Never rely on a jack alone. Jack stands provide stable support.
- Lug Wrench: For removing the lug nuts on your wheels.
- C-Clamp or Brake Caliper Tool: This compresses the caliper piston so you can slide it back and install new pads.
- Socket Set and Wrenches: For removing the caliper bolts and bracket hardware.
- Brake Cleaner Spray: Cleans off dirt and grease from brake components.
- Bungee Cord or Wire Hanger: To hang the caliper from the suspension. Never let it hang by the brake hose.
- Brake Grease: Lubricates the caliper slide pins and pad contact points.
- New Brake Pads: Make sure they match your vehicle make, model, and year.
Optional but Helpful Items
Some extra items can make the job easier. A torque wrench ensures you tighten bolts to the correct specification. Brake fluid is useful if you need to top off the reservoir after pushing the caliper piston back. Gloves and safety glasses protect your hands and eyes from brake dust. A wire brush helps clean rust off the caliper bracket. These small additions can make a big difference in your experience.
Step-by-Step Guide to Changing Brake Pads
Now let us get into the actual process. Follow these steps carefully and do not skip any safety precautions.
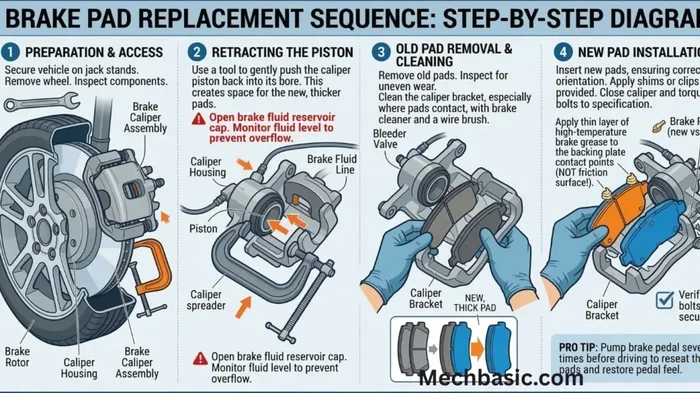
Step 1: Prepare the Vehicle
Start by parking on a flat, level surface. Engage the parking brake and turn off the engine. Loosen the lug nuts on the wheel you are working on before you lift the car. This prevents the wheel from spinning when it is in the air. Place the jack under the vehicle frame and lift it until the tire is off the ground. Then, secure the vehicle with jack stands. Never work under a car supported only by a jack.
Step 2: Remove the Wheel
Now fully remove the lug nuts and pull the wheel off. Set it aside in a safe place. You will now see the brake caliper, rotor, and brake pad hardware. Take a moment to observe how everything is connected before you start removing parts.
Step 3: Remove the Caliper
Locate the caliper bolts. These are usually two bolts on the back side of the caliper. Use the appropriate socket to remove them. Once the bolts are out, gently pull the caliper upward. It should slide off the brake pads easily. If it is stuck, a little gentle wiggling should free it. Never use excessive force. Hang the caliper from the suspension using a bungee cord or wire hanger. Do not let it dangle by the brake hose. That can damage the hose and cause a brake fluid leak.
Step 4: Remove Old Brake Pads
With the caliper removed, you can see the old brake pads sitting in the caliper bracket. Slide them out carefully. You may need to remove a retaining clip or shim first. Inspect the caliper bracket for rust or debris. Clean it with brake cleaner and a wire brush if needed. Also check the slide pins and lubricate them with brake grease if they look dry or corroded.
Step 5: Compress the Caliper Piston
Before installing the new pads, you need to push the caliper piston back into its bore. Place the old brake pad against the piston face. Use the C-clamp to slowly and evenly press the piston back. This creates room for the thicker new pads. If your vehicle has a quick-release caliper piston, you can turn it back with a wrench instead. Watch for any brake fluid leaking from the reservoir when you push the piston. A small amount of fluid returning to the reservoir is normal.
Step 6: Install New Brake Pads
Now it is time to put in the fresh pads. Apply a thin layer of brake grease to the contact points on the caliper bracket. This reduces noise and allows the pads to slide freely. Slide the new pads into the bracket. Make sure any shims or wear sensors are in the correct position. Reinstall the caliper over the new pads and bolt it back into place. Tighten the caliper bolts to the manufacturer specification using a torque wrench.
Step 7: Reinstall the Wheel
Put the wheel back on and hand-tighten the lug nuts. Lower the vehicle slightly so the tire touches the ground but is not fully supporting the weight. Then tighten the lug nuts in a star pattern to ensure even pressure. Lower the vehicle completely and remove the jack stands. Give the lug nuts one final check.
Step 8: Test the Brakes
Before you drive anywhere, pump the brake pedal several times. This seats the new pads against the rotor. Start the car and press the brake pedal. It should feel firm. If it feels soft or goes to the floor, you may need to bleed the brakes. Take a slow test drive in a safe area. Apply the brakes gently at first to bed in the new pads. Avoid hard braking for the first 200 miles to allow the pads to fully seat.
Types of Brake Pads: Which One Should You Choose?
Not all brake pads are the same. Different pad compounds offer different performance characteristics. Choosing the right one depends on your driving style, budget, and vehicle type.
Ceramic Brake Pads
Ceramic brake pads are the most popular choice for everyday driving. They are made from a ceramic compound that is gentle on rotors and produces less dust. Ceramic pads are quiet and provide consistent performance in both hot and cold weather. They also tend to last longer than other pad types. The downside is they cost a bit more than organic pads. For most daily drivers, ceramic is the best all-around choice.
Semi-Metallic Brake Pads
Semi-metallic pads contain a mix of metal fibers and other materials. They offer excellent stopping power and handle high temperatures well. These pads are common in performance vehicles and heavy-duty applications. The trade-off is they can be noisier and produce more brake dust. They may also wear rotors faster than ceramic pads. If you tow heavy loads or drive in mountainous areas, semi-metallic pads might be a good fit.
Organic Brake Pads
Organic pads are made from non-metallic materials like rubber, glass, and resin. They are the softest and quietest option. They also produce the least brake dust. However, they wear out faster than ceramic or semi-metallic pads. Organic pads work best for light-duty, low-speed driving. They are not ideal for heavy braking or high-performance situations.
Common Mistakes to Avoid When Changing Brake Pads
DIY brake pad replacement is straightforward, but mistakes can happen. Avoiding these common errors will keep you safe and ensure your brakes work properly.
- Forgetting to Compress the Caliper Piston: If you do not push the piston back, you cannot fit the new pads. This is the most common beginner mistake.
- Skipping Brake Hardware: New pads come with clips, shims, and sensors. Install all of them. Missing hardware causes noise and uneven pad wear.
- Not Lubricating Slide Pins: Dry slide pins cause the caliper to stick. This leads to uneven pad wear and reduced braking performance.
- Over-Tightening Bolts: Use a torque wrench to tighten bolts to spec. Over-tightening can strip threads or warp the caliper bracket.
- Not Bedding In New Pads: Bedding in is the process of gradually transferring pad material to the rotor. Skip this, and you may experience reduced braking power and noise.
- Ignoring Brake Fluid Levels: Pushing the piston back raises the fluid level in the reservoir. Check it after the job and top off if needed.
When Should You See a Mechanic Instead?
Changing brake pads is a great DIY project, but it is not the only brake repair you might need. Know your limits and recognize when a job is beyond a home mechanic.
Signs You Need Professional Help
Some brake issues require a trained professional. If you notice any of the following, consider visiting a shop:
- Warped Brake Rotors: If your steering wheel vibrates when braking, the rotors may be warped. Resurfacing or replacing rotors requires special tools and knowledge.
- Brake Fluid Leaks: Any sign of fluid pooling near the wheels is a serious concern. Brake fluid leaks can lead to brake failure.
- Damaged Brake Lines: Metal brake lines can corrode or get damaged. Replacing them requires specific tools and flaring equipment.
- ABS Warning Light: If the ABS light is on, there is an electronic issue that needs a diagnostic scan tool.
- Stuck Caliper: A caliper that will not slide or compress may need rebuilding or replacement.
If you are unsure about any part of the brake pad replacement process, it is always okay to ask a professional for help. Many shops will guide you through the process or perform the job at a fair rate. Your safety on the road is worth more than any savings.
Brake Pad Replacement Cost: DIY vs. Mechanic
One of the biggest motivators for DIY brake pad replacement is cost savings. Let us break down the numbers so you can see the real difference.
| Cost Factor | DIY | Mechanic Shop |
|---|---|---|
| Brake Pad Parts (per axle) | $30 – $100 | $30 – $100 (included in labor) |
| Labor Cost | $0 | $80 – $200 |
| Total Cost (per axle) | $30 – $100 | $110 – $300 |
| Time Required | 1 – 2 hours | 30 minutes to 1 hour (plus wait time) |
| Tools Required | Basic toolkit | None (shop provides them) |
As you can see, doing it yourself can save you anywhere from $80 to $200 per axle. Multiply that by two axles, and the savings add up quickly. Plus, you learn valuable skills that apply to other car repairs. The only real cost beyond the pads is the price of basic tools if you do not already own them.
Brake Pad Maintenance Tips for Longer Life
Once you have replaced your brake pads, you want them to last as long as possible. Good maintenance habits can extend pad life and keep your brake system in top shape.
- Avoid Riding the Brakes: Keeping your foot on the brake pedal while driving creates unnecessary wear. Apply brakes smoothly and release them fully.
- Maintain a Safe Following Distance: The more you have to brake hard, the faster your pads wear. Leave plenty of space between you and the car ahead.
- Check Brake Fluid Regularly: Low brake fluid can affect braking performance. Check the reservoir monthly and top off with the correct DOT fluid.
- Inspect Pads Every Oil Change: Get in the habit of visually checking your brake pads during routine maintenance. Catching thin pads early prevents rotor damage.
- Drive Defensively: Anticipating stops and slowing down gradually reduces the strain on your brake system.
Final Thoughts on DIY Brake Pad Replacement
So, can I change the brake pads myself? Absolutely. Brake pad replacement is one of the most satisfying and practical DIY repairs you can do. It does not require advanced mechanical skills or expensive equipment. With a basic set of tools, the right brake pads, and this guide, you can complete the job safely and confidently.
Remember to take your time and follow each step carefully. Safety is the top priority. Work on a stable surface, use jack stands, and double-check every bolt before you drive. If something feels wrong or you are unsure about a step, do not hesitate to consult a professional. The goal is to keep your car running safely and reliably.
Once you have changed your brake pads yourself, you will wonder why you ever paid a mechanic to do it. It is a simple, rewarding job that anyone can learn. Grab your tools, pick up a set of quality pads, and give it a try. Your wallet and your car will thank you.
Frequently Asked Questions
How long does it take to change brake pads yourself?
For most people, changing brake pads takes about one to two hours per axle. If you are doing both front and rear, plan for three to four hours total. Your first time might take a little longer as you get familiar with the process.
Can I reuse the old brake caliper hardware?
It is best to replace the caliper hardware with new clips, pins, and shims. Reusing old hardware can lead to noise, uneven pad wear, and caliper sticking. New hardware is inexpensive and ensures proper function.
Do I need to bleed my brakes after changing pads?
In most cases, no. Changing brake pads does not require bleeding the brakes unless you open a brake line or the pedal feels soft after the job. If the pedal feels spongy, bleeding the brakes is a good next step.
What happens if I dont change worn brake pads?
Worn brake pads reduce your stopping power and can damage the brake rotors. Once the friction material wears down completely, metal rubs against metal. This can warp the rotor and lead to much more expensive repairs.
Are ceramic brake pads better than semi-metallic?
Ceramic pads are quieter, cleaner, and gentler on rotors. Semi-metallic pads offer stronger stopping power and handle high heat better. The best choice depends on your driving style. For most daily drivers, ceramic is the preferred option.
How do I know if my brake pads are properly installed?
After installation, the brake pedal should feel firm. There should be no grinding or squealing sounds. Check that the pads sit evenly in the bracket and the caliper slides freely. A test drive in a safe area will confirm everything is working correctly.